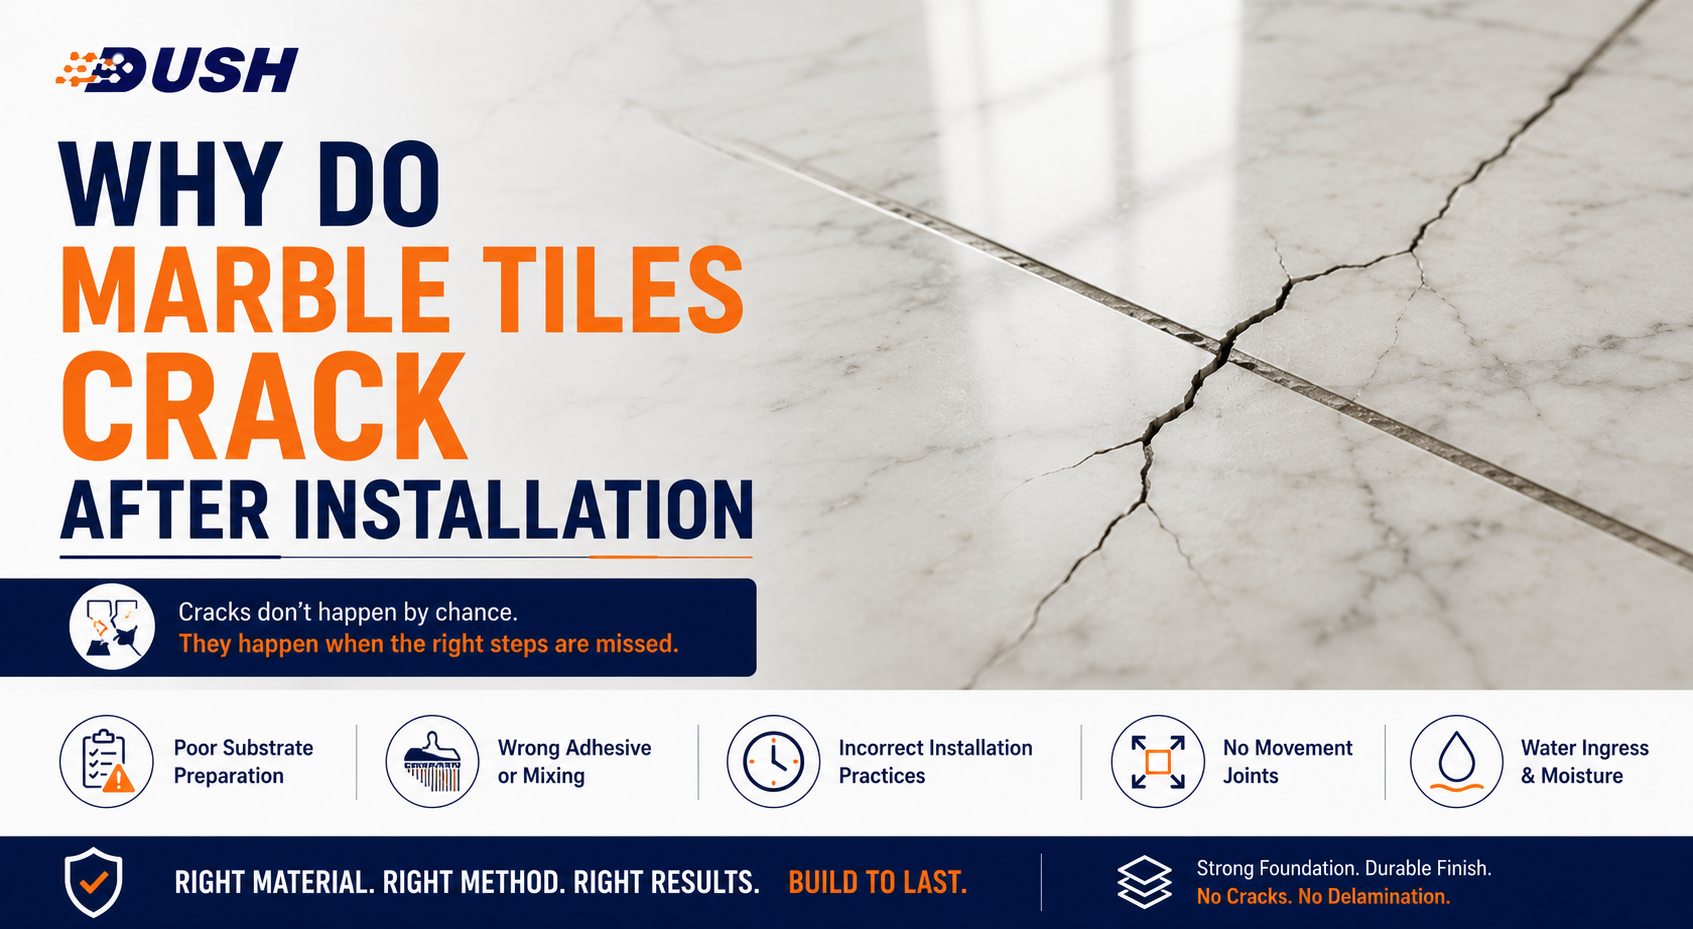
Marble cracking after installation is not random. It is structurally predictable, directly traceable to specific installation errors, and entirely preventable with the correct adhesive specification and application technique. This guide explains exactly how and why marble cracks — mechanically, specifically, and with the technical data that makes each cause clear.
How Marble Cracks — Understanding the Stone’s Physical Limitations

Why Marble Is More Brittle Than Ceramic or Porcelain
Ceramic tile is manufactured at high temperatures that fuse the clay body into a dense, homogeneous matrix. It has some flex tolerance — a thin ceramic tile can deflect slightly before fracturing. This flex tolerance means ceramic can span small hollow sections without cracking under moderate loads.
Marble has no such tolerance. It is a metamorphic rock — calcium carbonate recrystallised under geological heat and pressure into an interlocking matrix of calcite crystals. This crystal matrix is rigid and brittle. It does not flex before fracturing. When a marble slab is subjected to bending stress across an unsupported hollow section, it does not deflect measurably — it cracks. The crack propagates along crystal grain boundaries with no warning and no gradual deformation.
This is why the installation standard for marble is categorically stricter than for ceramic: 95 to 100% adhesive contact coverage versus 65 to 75% for standard ceramic. For marble, the coverage requirement is not a quality recommendation — it is a structural necessity.
The Crystal Structure That Makes Marble Vulnerable
Marble’s calcite crystal matrix creates micro-planes of weakness at crystal grain boundaries. These grain boundaries are the paths along which cracks propagate once initiated. In high-quality marble, the crystal structure is uniform and the grain boundaries are distributed evenly — making the stone relatively consistent in its crack resistance. In marble with natural fissures — fine pre-existing weaknesses along mineral deposits or crystal discontinuities — these are the first locations where stress-induced cracking initiates.
Statuario marble, prized for its translucency and purity, has one of the most open crystal structures of any Italian marble. This openness is what makes it visually spectacular — and what makes it the most brittle and crack-susceptible Italian marble variety. A hollow section that might not cause cracking in denser Carrara marble can cause a through-body crack in Statuario under the same load.
The Difference Between Surface Cracks and Through-Body Cracks
Surface cracks — hairline cracks visible on the polished surface but not penetrating through the slab — are often pre-existing fissures filled by the quarry or fabricator with clear epoxy resin, or fissures that open during transportation or cutting. They are typically a stone quality issue, not an installation issue.
Through-body cracks — fractures that run through the full thickness of the marble slab — are almost always installation-related. They indicate that the marble was subjected to bending stress it could not accommodate — typically from hollow sections below or from point loading on an inadequately supported slab. Through-body cracks require full tile replacement. They cannot be adequately repaired in structural terms, though colour-matched epoxy filler can reduce visual impact.
The Seven Structural Causes of Marble Tile Cracking After Installation
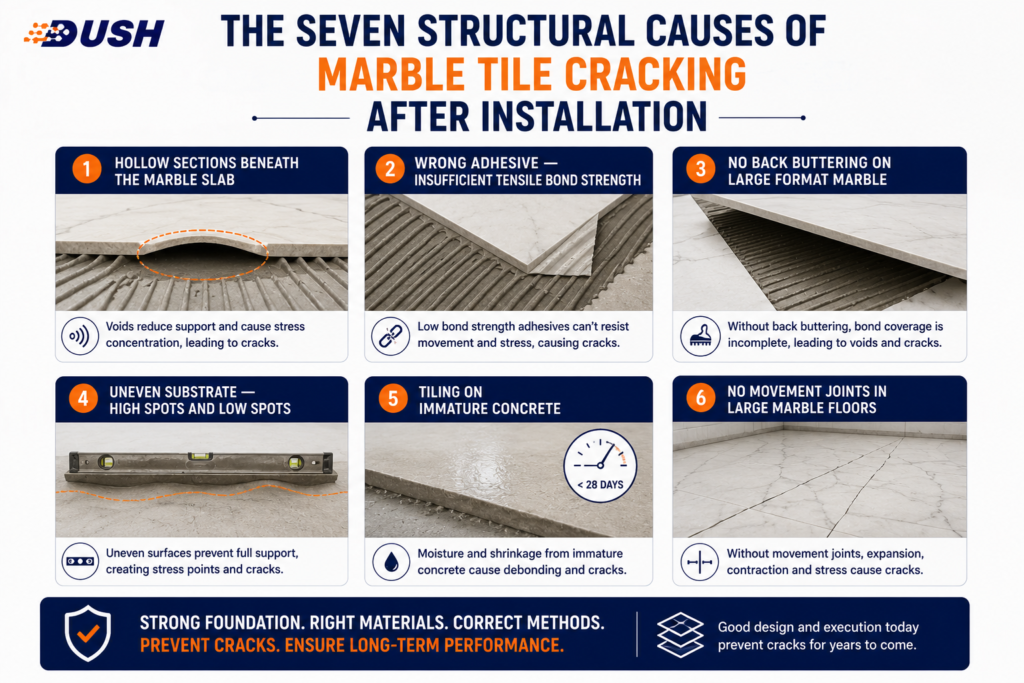
Cause 1 — Hollow Sections Beneath the Marble Slab
Hollow sections — areas where the marble has no adhesive contact with the substrate — are the primary structural cause of marble cracking in India. They arise from two sources: inadequate adhesive coverage (applying adhesive with an undersized trowel without back buttering) and skinned adhesive placement (pressing marble onto adhesive that has exceeded its open time and formed a dry surface skin).
The mechanics of hollow-section cracking are straightforward. A marble slab spanning a hollow section is effectively a beam supported at two points — the bonded edges — with an unsupported span in the middle. When a point load is applied above the hollow span — a chair leg, a dropped object, the heel strike of foot traffic — the marble experiences bending stress across the unsupported distance. Marble cannot bend. It cracks. The crack initiates at the lower face of the slab (the adhesive-contact face) and propagates upward through the slab to the polished surface.
For a 90×60 cm Statuario slab at 18 mm thickness: a 30% hollow section (which is common with standard trowel application without back buttering) produces an unsupported span of approximately 300 mm in the hollow area. A load of 30 kg applied as a point load over this span generates bending stress at the slab soffit that exceeds the tensile strength of the marble’s crystal matrix. The slab cracks.
Cause 2 — Wrong Adhesive — Insufficient Tensile Bond Strength
Cement-sand mortar and basic Type 1 cementitious adhesive do not deliver the bond strength that marble’s weight and load demands require. The bond beneath a marble slab is not simply holding the slab’s static weight — it is resisting the combined gravitational, impact, and thermal forces that act on the slab across decades of use.
Cement-sand mortar delivers an effective tensile bond strength of approximately 0.3 to 0.5 N/mm² — variable by site mix, water content, and curing conditions. IS 15477:2019 Type 4 TS1 polymer-modified adhesive delivers a tested tensile bond strength of 1.61 N/mm² for Dush Apex Limitless. This is not a marginal difference — it is a threefold to fivefold gap in the structural resistance of the adhesive bond. The complete performance comparison between polymer-modified adhesive, cement-sand mortar, and white cement — with the independently tested tensile figures behind each establishes exactly how large this gap is and why it determines whether marble cracks under load.
As a cement mortar bond progressively weakens under moisture exposure, thermal cycling, and sustained load — which it will over years — the structural support it provides the marble slab diminishes. The marble that was adequately supported at installation becomes progressively less supported. The threshold for cracking under load gets lower each year. Eventually, a load that would not have cracked the marble at year one causes through-body cracking at year five.
Cause 3 — No Back Buttering on Large Format Marble
Back buttering — applying a complete skim coat of tile adhesive to the marble slab back face before pressing onto the substrate — is not optional for marble. It is the step that achieves 95 to 100% adhesive contact coverage that marble’s brittleness demands.
Without back buttering, adhesive applied to the substrate with a 10 mm notched trowel achieves approximately 60 to 70% coverage — adequate for ceramic tile, structurally insufficient for marble. The uncovered 30 to 40% of the marble back surface sits above hollow sections with no adhesive support. The complete technical explanation of why 95 to 100% coverage is the structural requirement for heavy marble slabs — and the back buttering technique that achieves it covers why this single omission is responsible for a significant proportion of marble cracking in Indian installations.
Cause 4 — Uneven Substrate — High Spots and Low Spots
The substrate flatness standard for marble installation is maximum 3 mm deviation under a 2-metre straight edge. This is a tighter tolerance than for standard ceramic (which tolerates 5 mm) — and it is not arbitrary.
A high spot beneath a marble slab creates a fulcrum — a single point of elevated contact around which the slab rocks under load. The rocking motion creates cyclic bending stress at the high-spot contact point, initiating a crack at that location over time. A single high spot of 5 mm beneath a 90×60 cm marble slab is sufficient to create the rocking condition that produces edge cracking.
Low spots create hollow sections — areas where the adhesive bed does not reach the marble back even when back buttering is correctly applied. A 10 mm low spot in the substrate creates a 10 mm void in the adhesive bed that no application technique can fill without pre-levelling.
Cause 5 — Tiling on Immature Concrete
New concrete continues to shrink as it loses moisture through the curing process. This shrinkage — typically 0.3 to 0.5 mm per metre of concrete — continues for 28 days from the pour date. Tiling on concrete before 28 days bonds marble to a substrate that is still in dimensional change.
As the concrete completes its shrinkage cycle beneath the adhesive bed, the shrinkage movement creates shear stress at the adhesive-substrate interface. This shear stress is transferred through the adhesive to the marble slab. Marble, with no capacity to accommodate shear-induced bending, cracks. The cracking pattern in these cases is often a grid of fine cracks across multiple slabs — following the direction of concrete shrinkage — rather than the localised crack patterns associated with hollow sections or impact.
Cause 6 — No Movement Joints in Large Marble Floors
Marble expands and contracts with temperature change. Its coefficient of thermal expansion is approximately 5 to 7 × 10⁻⁶ per °C — meaning a 10 m run of marble floor expands by approximately 0.5 to 0.7 mm for every 10°C temperature rise. In an Indian living room that goes from a cool air-conditioned 22°C to a summer afternoon ambient of 40°C, a 10 m marble floor expands by approximately 0.9 to 1.3 mm.
Without movement joints to accommodate this expansion, the compressive stress built up in the tile field has nowhere to go. Adjacent tiles push against each other. The weakest point in the marble — a natural fissure, an edge with partial adhesive coverage, a corner with a hollow section — becomes the crack initiation point. The crack propagates outward from that point in the direction of the compressive force.
Outdoor marble is especially vulnerable — temperature swings of 35 to 40°C between Indian summer peaks and winter minima generate compressive forces that no adhesive S1 deformability rating can entirely absorb across a large tile field without movement joints. The complete specification of tile adhesive classifications for outdoor marble and the movement joint requirements that prevent thermal cracking establishes the outdoor marble cracking prevention standard.
Cause 7 — Impact Loading on Hollow Sections
A marble slab with 95 to 100% adhesive contact distributes point load impact — a dropped object, a heel strike, a chair leg — across the full adhesive bed area. The load per unit area is low, and well within the marble’s tensile capacity at the slab soffit.
The same impact on a marble slab with a 30% hollow section concentrates the load at the edges of the hollow. The impact energy, instead of distributing across 0.54 m² (90×60 cm slab), concentrates at the contact edges of the hollow perimeter — perhaps 0.1 m² of actual support. The effective load per unit area increases fivefold. This concentrated load creates bending stress at the hollow edge that initiates cracking. The marble slab that appeared safely installed then cracks from what seems like a minor impact — because the hollow section had already created the structural vulnerability.
Variety-Specific Cracking Vulnerabilities
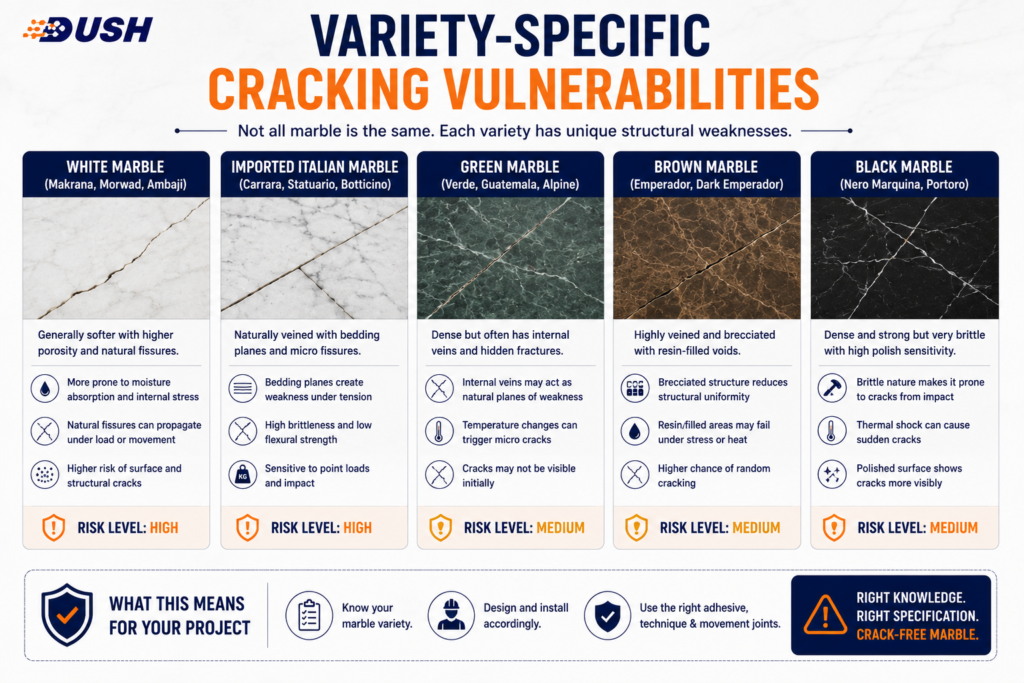
Statuario — The Most Brittle Italian Marble
Statuario is the highest-risk Italian marble for post-installation cracking. Its near-translucent, open crystal structure — the property that makes it the world’s most prized marble — makes it the most brittle at standard installation thicknesses. An 18 mm Statuario slab has measurably lower bending resistance than an 18 mm Carrara slab of the same dimensions, because Statuario’s crystal openness reduces the effective load-bearing cross-section of the stone. Any hollow section beneath Statuario — regardless of its size — is a potential crack initiation point under normal floor loading. Back buttering is absolutely non-negotiable for Statuario at any format.
Carrara — Edge and Joint Cracking
Carrara’s denser crystal structure makes it somewhat more forgiving than Statuario — but it is still marble, and it still has zero bending tolerance at thin sections. Carrara cracking in Indian installations is most commonly edge cracking — cracking at the tile edges and corners where hollow sections are most likely to exist (the extreme edges of even well-applied adhesive tend to have the lowest coverage). Carrara edge cracking is worsened by lippage — a height difference between adjacent tiles — where the raised edge of one tile creates a point contact condition with foot traffic rather than a distributed load condition.
Emperador — Weakness Planes in Dense Stone
Emperador marble is significantly denser than Statuario or Carrara — its dark colour and dense mineral composition give it greater mass per unit volume and slightly higher bending resistance. However, Emperador has characteristic weakness planes — linear internal weaknesses along the mineral banding that gives the stone its distinctive chocolate-brown pattern. Cracking in Emperador typically follows these mineral banding planes rather than propagating randomly. Installation errors that cause cracking in Emperador — hollow sections, impact loads — produce characteristically straight cracks following the banding direction. The full guide to adhesive requirements for Statuario, Carrara, and Emperador — including the variety-specific structural demands each makes of the adhesive covers how each variety’s physical structure determines its installation specification.
Indian Marble — Makrana and Rajasthan Varieties
Indian marble varieties — Makrana white, Banswara, Dungri, and the various Rajasthan-quarried stones — have a wider quality range than Italian marble from controlled quarrying zones. The best Indian marble (Makrana white, the grade used in the Taj Mahal) has excellent crystal uniformity. Lower grades have significant fissures, voids, and mineral inclusions that are filled by fabricators before polishing. These filled fissures are the primary crack initiation points in Indian marble after installation — the filler (typically transparent resin) has different thermal expansion characteristics from the stone, and under thermal cycling the differential movement opens the fissure and the resin fails, exposing the underlying crack.
How Hollow Sections Cause Marble to Crack — The Mechanics in Detail
Why 65% Coverage Is Adequate for Ceramic but Fatal for Marble
The 65 to 75% coverage standard for ceramic tile is based on the tile’s material properties — ceramic has enough flex tolerance to accommodate the bending stress created by small hollow sections under normal load. A 300×300 mm ceramic tile with 30% hollow coverage can flex the fraction of a millimetre that hollow section loading demands without fracturing.
A 600×600 mm marble slab at 18 mm thickness has essentially zero flex tolerance. Any bending stress from a hollow section — however small the hollow — creates tensile stress at the slab soffit that exceeds the marble’s modulus of rupture if the hollow span is large enough and the load sufficient. The 95 to 100% coverage requirement for marble exists because any meaningful hollow section is a structural liability for a brittle stone with no bending tolerance.
The Edge Loading Failure Mode
The most common hollow-section cracking pattern in Indian marble installations is edge cracking — cracks that initiate at tile edges and propagate toward the tile centre. Edge cracking results from the most common coverage failure: good coverage across the central area of the tile but reduced coverage at the tile edges, where the adhesive ridges taper and the back butter coat does not reach consistently.
The marble edge is the most structurally vulnerable section — the thinnest cross-section, farthest from the centre of the slab, and most likely to be in contact with lippage (adjacent tiles at slightly different heights). When a hollow exists at the tile edge and foot traffic applies load at that edge — or when a chair or table leg applies point load near the edge — the marble edge cracks inward, following the path of least resistance through the crystal structure.
Why Point Loads Are the Final Trigger
Point loads — chair legs, table legs, dropped heavy objects, high-heel impact — are the final trigger for cracking that hollow sections have already prepared. The marble slab is the structural element. The adhesive bed is the support structure. When the support structure has voids, the marble behaves as a beam with unsupported spans. Point loads applied over these spans generate the bending moment that exceeds the marble’s tensile strength at the slab soffit.
This is why marble cracks appear suddenly — weeks or months after installation, from what seems like a minor cause. The hollow section was the structural weakness created at installation. The chair leg or dropped object was merely the load that exceeded the already-compromised structural capacity.
Substrate Problems That Lead to Marble Cracking
Flatness Tolerance for Marble — Why 3 mm Matters
The 3 mm maximum deviation under a 2-metre straight edge is the flatness tolerance for marble installation — tighter than for ceramic (5 mm) because marble’s brittleness is less forgiving of the rocking that high spots create. A 5 mm high spot beneath a marble slab creates a fulcrum that concentrates all applied load at a single contact point — the equivalent of an extremely high point load. The cyclic rocking under foot traffic at this high-spot fulcrum initiates a fatigue crack in the marble above it. The full substrate preparation standard for marble and natural stone — including how to identify and correct out-of-tolerance flatness before any adhesive is applied establishes the complete substrate verification process that prevents substrate-related cracking.
Hollow Substrate Beneath Marble
A hollow section in the existing screed or concrete substrate beneath the tile creates a two-layer hollow: the substrate hollow plus the adhesive coverage gap above it. Marble installed over hollow substrate is guaranteed to crack — even with perfect adhesive application, the substrate hollow means the adhesive has no rigid support beneath it. The adhesive deforms under point load, and the marble cracks across the deformation.
Sound all substrate areas with a hammer before tiling. Every hollow section in the existing substrate must be cut out, filled with repair mortar, and cured to full strength before adhesive is applied. There is no shortcut and no adhesive specification that compensates for hollow substrate.
Immature Concrete and Shrinkage Cracking
New concrete continues shrinking for 28 days. The dimensional change during this period — as moisture leaves the concrete matrix — creates shear forces at the adhesive-substrate interface that transfer as bending stress to the marble above. Marble tiled at 7 days on new concrete often shows cracking at 21 to 28 days, as the concrete completes its shrinkage cycle and the cumulative shear stress finally exceeds the marble’s crack resistance. Always wait the full 28 days from concrete pour date before beginning marble installation.
Thermal Movement and Marble Cracking in India
Marble’s Coefficient of Thermal Expansion
Marble’s coefficient of thermal expansion ranges from 5 to 7 × 10⁻⁶ per °C depending on variety. Denser marble varieties (Emperador) have slightly higher thermal expansion than lighter varieties (Statuario). This means a 10-metre run of Italian marble floor expands approximately 0.5 to 0.7 mm for every 10°C temperature rise — invisible to the eye, but structurally significant when multiplied across a large floor area with no relief joints.
Why Movement Joints Are Non-Negotiable for Large Marble Floors
A 50 sqm Indian living room marble floor going from a winter evening temperature of 15°C to a summer afternoon of 40°C experiences a 25°C temperature rise. The marble expands approximately 1.25 to 1.75 mm per 10 metres of floor run in both directions. Without movement joints to accommodate this expansion, the tile field is in compression — the tiles are pushing against each other and against the perimeter walls. The compression is relieved at the weakest point: the marble tile with a natural fissure, the tile above a hollow section, or the tile with the lowest-coverage bond.
Movement joints at 4 to 5 metre intervals in large indoor marble floors and at 3 metre intervals in outdoor marble are not aesthetic choices — they are the structural relief mechanism that prevents compressive cracking across the tile field.
Outdoor Marble — The Most Vulnerable Application
Outdoor marble terraces in India face the full severity of Indian thermal cycling — potentially 40°C seasonal temperature swings in North India. The combination of large temperature range, no roof insulation moderating surface temperature, and continuous UV exposure makes outdoor marble the most thermally stressed application. Outdoor marble requires EN 12004 S1 deformable adhesive to accommodate movement at the adhesive bed level, movement joints at 3-metre intervals to relieve field-level compressive stress, and honed finish to provide slip resistance in wet conditions. Polished marble on outdoor Indian terraces without adequate movement joints will crack within two to three thermal cycling seasons.
How to Prevent Marble Cracking — The Complete Installation Standard
Step 1 — Correct Adhesive: IS 15477:2019 Type 4 TS1
The adhesive beneath marble must carry independently tested tensile bond strength above the IS 15477:2019 Type 4 TS1 threshold — both Type 4 (polymer-modified composition) and TS1 (independently tested tensile performance) must be present on the product packaging. Dush Apex Limitless delivers 1.61 N/mm² tested tensile bond strength under IS 15477:2019 Type 4 TS1 — the structural bond performance that marble’s weight and load demands require across decades of installation life.
Step 2 — Correct Coverage: 95-100% Through Back Buttering
Apply Dush Apex Limitless to the substrate with a 10 mm notched trowel (12 mm for slabs above 90×90 cm), combing parallel ridges in one direction. Apply a complete skim coat of Dush Apex Limitless to the marble slab back face using a flat trowel. Press the back-buttered slab into the ridged substrate adhesive bed — the two adhesive surfaces merge to create a continuous, void-free bond across the full slab area. This is the only method that consistently achieves 95 to 100% adhesive contact coverage for marble. The complete back buttering technique and the trowel size specifications for every marble slab format used in Indian residential and commercial projects establishes the full coverage methodology that prevents hollow-section cracking.
Step 3 — Correct Substrate: 3 mm Flatness Before Any Adhesive
Check the substrate with a 2-metre straight edge in multiple directions before adhesive application. Maximum 3 mm deviation permitted. Grind high spots. Fill low spots with levelling compound and allow full cure. Sound all existing substrate for hollow sections. Correct all deviations before adhesive is applied — no adhesive specification compensates for an out-of-tolerance substrate.
Step 4 — Correct Open Time: Never Place on Skinned Adhesive
Place marble within the 45-minute open time of Dush Apex Limitless — the EN 12004 E (extended open time) classification. Test before each slab placement: press a thumb firmly onto an adhesive ridge. If the ridge deforms and adhesive transfers cleanly to the thumb, the open time is still active. If the ridge does not deform, the open time has been exceeded — scrape the area, apply fresh adhesive, and place immediately. The complete step-by-step installation guide covering every stage from mixing through curing where open time management determines whether marble bonds correctly or appears bonded but is not covers the full installation sequence that eliminates skinned adhesive placement.
Step 5 — Correct Movement Joints: Every 3-4 m in Large and Outdoor Areas
Install silicone-filled movement joints at 4 to 5 metre intervals in large indoor marble floors and at 3 metre intervals in outdoor marble. At all perimeter positions — marble field meeting walls, columns, step edges — fill with white neutral-cure silicone sealant, not cement grout. These joints are the thermal relief mechanism that prevents compressive cracking across the marble tile field.
Diagnosing Why Your Marble Cracked — Reading the Pattern
The location and pattern of marble cracking diagnoses its cause. A single crack running across the centre of a large slab indicates hollow-section loading — the crack initiated at the slab soffit above the largest hollow. Edge cracks radiating from a corner indicate a rocking condition from a high-spot substrate — the tile was supported at two high points with the corner unsupported. Cracks running parallel to grout joints across multiple tiles indicate thermal movement without movement joints — the compressive stress was relieved at the weakest tile boundaries. A radiating star crack from a single point indicates impact loading above a hollow section — the impact was the trigger, the hollow was the structural vulnerability that allowed the crack to propagate.
Understanding the crack pattern is the first step in the repair sequence — because the repair must address the cause, not just the crack. Filling a through-body crack with coloured epoxy without correcting the hollow section beneath it produces a repaired-looking tile that cracks again within months from the same cause.
Dush Apex Limitless — The Adhesive Specification That Prevents Marble Cracking
Every structural cause of marble cracking identified in this guide is addressed directly by the Dush Apex Limitless specification:
Cracking causeDush Apex Limitless specification that addresses itInsufficient tensile bond strength1.61 N/mm² tested under IS 15477:2019 Type 4 TS1 — independently verified, not estimatedSkinned adhesive placement45-minute open time (EN 12004 E) — more than double standard adhesiveInsufficient coverage — no back butteringCompatible back-butter product — same adhesive on substrate and slab backOutdoor thermal cracking — no S1EN 12004 S1 deformability — 2.5 mm lateral movement accommodationWall marble anti-sagEN 12004 T — 0.12 mm maximum slip on vertical surfaceGrey pigment staining alongside cracking riskPure white formulation — eliminates both staining and crack-initiating stress from pigment migrationItalian marble — strictest applicationManufactured in Italy to EN 12004 C2TE S1 — the standard used domestically for Italian marble installation
Frequently Asked Questions — Marble Tile Cracking After Installation
Why Did My Marble Floor Crack So Soon After Installation?
Rapid cracking — within weeks or months of installation — almost always indicates one of three structural installation errors. Hollow sections beneath the marble from inadequate coverage or no back buttering, with a point load (chair leg, dropped object) triggering the crack at the hollow edge. Marble placed on skinned adhesive that appeared bonded but had no structural bond — the slab was resting on a cured surface rather than bonded to it, and cracked under the first significant load. Or tiling on immature concrete less than 28 days old, where concrete shrinkage created shear stress at the adhesive interface that fractured the marble as the concrete completed its cure.
Can Cracked Marble Tiles Be Repaired?
Hairline surface cracks and narrow through-body cracks can be filled with colour-matched transparent or tinted epoxy resin — the visual result depends on the crack width and the marble colour. However, epoxy filling without addressing the underlying structural cause — hollow section, high-spot substrate, no movement joint — will produce re-cracking at the same location within months. Repair must address the cause first: lift the tile if hollow section is identified, correct the substrate, and re-fix with IS 15477:2019 Type 4 TS1 adhesive with full back buttering before epoxy-filling any remaining hairline surface crack.
Why Does Marble Crack at the Edges and Corners?
Marble edge and corner cracking is the most common cracking pattern in Indian installations — and it is directly caused by insufficient adhesive coverage at the tile perimeter. Even when back buttering is applied, the skim coat on the tile back can taper at the edges, and the notched trowel ridges on the substrate can miss the extreme perimeter. The resulting hollow section at the tile edge creates the structural vulnerability. Foot traffic near tile edges, chair and table legs near edges, and lippage between adjacent tiles all apply concentrated load at the edge — the already-hollow location with the lowest structural support. Correct back buttering technique, applied to the full tile back surface including edges and corners, is the specific prevention.
Does White Adhesive Prevent Marble Cracking?
White adhesive prevents staining — the grey pigment migration that permanently discolours marble. It does not in itself prevent cracking. The cracking prevention properties come from the polymer-modified classification (Type 4), the independently tested tensile strength (TS1), the extended open time (EN 12004 E), and the correct application technique (back buttering, substrate preparation, placement within open time). Dush Apex Limitless is white AND polymer-modified AND Type 4 TS1 — addressing both the staining risk and the structural bond requirement for marble in a single product specification.
Which Marble Variety Is Most Prone to Cracking?
Statuario is the most crack-prone Italian marble because its open crystal structure — the property that makes it translucent and prized — makes it the most brittle at standard 18–20 mm installation thicknesses. Carrara is somewhat more forgiving in the slab body but cracks readily at edges with inadequate coverage. Emperador is denser and crack-resistant at the slab body level but can crack along mineral weakness planes under concentrated point loads. All Italian marble varieties require the same installation standard: IS 15477:2019 Type 4 TS1 adhesive, 95 to 100% bond coverage through back buttering, 3 mm substrate flatness, and placement within the 45-minute open time of Dush Apex Limitless.
How Much Coverage Does Marble Need to Prevent Cracking?
95 to 100% adhesive contact coverage is the structural requirement for marble at all formats and all applications. This figure is not a quality preference — it is derived from marble’s zero flex tolerance. Any meaningful hollow section beneath a marble slab is a potential crack initiation point under load. 95 to 100% coverage is achievable only through the combination of correct notched trowel application to the substrate (10–12 mm notch for marble formats above 60×60 cm) and mandatory back buttering of the marble slab back face before placement. The tap test after installation is the verification — any hollow sound indicates insufficient coverage that requires immediate correction before the marble is loaded.