The solution is straightforward, and it is known before a single slab is placed: use only white polymer-modified cement adhesive chemical, classified IS 15477:2019 Type 4 TS1. Everything else in this guide — the substrate preparation, the mixing, the trowel technique, the back buttering, the curing — supports that single central decision. Get the adhesive chemical right, and Italian marble can be fixed in India without any staining risk.
Dush Apex Limitless — a white polymer-modified tile adhesive chemical manufactured in Italy, certified IS 15477:2019 Type 4 TS1 and EN 12004 C2TE S1 — is the professional specification for Italian marble installation in India. This is the complete step-by-step method.
Why Italian Marble Stains — Understanding the Risk Before You Start
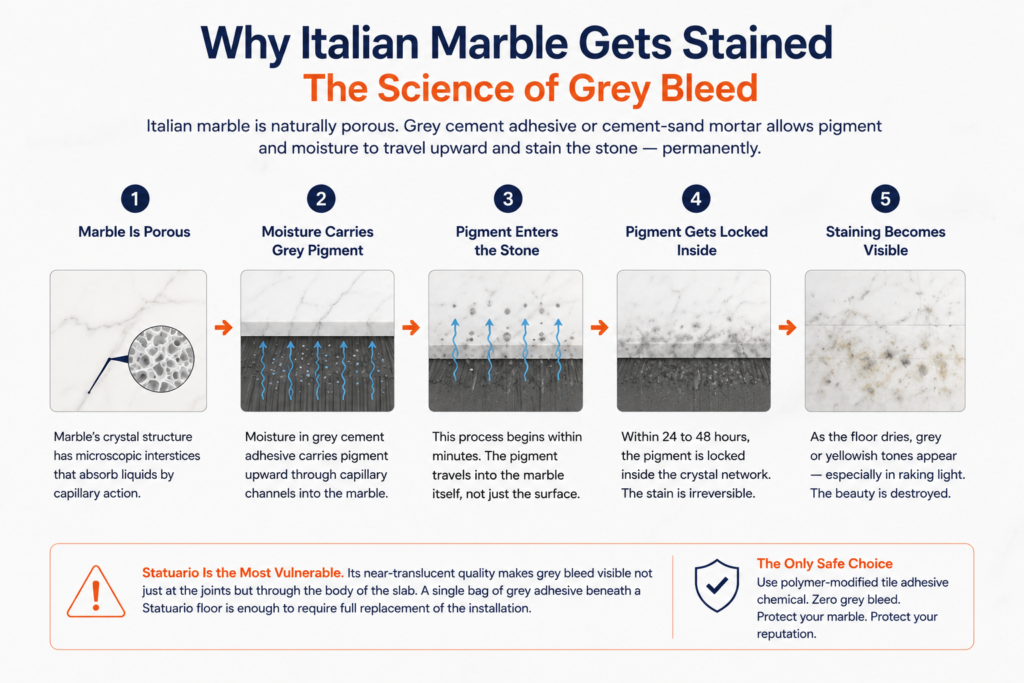
Italian marble is one of the most beautiful and most unforgiving materials used in Indian construction. Statuario, Carrara, Calacatta, Botticino — each variety has a crystalline structure that makes it simultaneously luminous and porous. That porosity is what creates the staining risk.
Marble’s crystal structure contains microscopic interstices — tiny gaps between mineral grains — that absorb liquids by capillary action. When grey cement adhesive or cement-sand mortar is applied beneath marble, the moisture in the mix carries grey cement pigment upward through capillary channels into the stone. This process begins within minutes of the marble being placed. The pigment does not stay at the surface of the adhesive. It travels into the marble itself.
By the time the adhesive has cured — within 24 to 48 hours — the pigment is fixed inside the stone’s crystal network. The marble that appeared pristine when it was laid has a grey or yellowish tone that emerges as the floor dries. In raking light — morning or evening sun across a Statuario floor — the staining is stark and irreversible. The full performance gap between grey cement, white cement, and polymer-modified adhesive — and why each produces a different outcome beneath marble — is covered in detail in this comparison.
Statuario is the most vulnerable. Its near-translucent quality means grey bleed is visible not just at the joints but through the body of the slab. A single bag of grey adhesive beneath a Statuario floor is enough to require full replacement of the installation.
Carrara is slightly more forgiving — its natural grey veining can partially mask light staining at joints — but grey cement bleed at tile edges and grout lines remains visible and permanent.
Emperador — a dark brown marble — has a different risk profile. The staining from grey cement is less visible in the stone body, but Emperador is susceptible to efflorescence: white mineral salt deposits that appear on the dark surface when moisture from grey cement migrates up through the stone and evaporates. White polymer-modified adhesive chemical significantly reduces this risk.
The mechanism of prevention is equally simple: white polymer-modified adhesive contains no iron oxide, no grey pigment, and no dark mineral particles. There is nothing to bleed. Dush Apex Limitless is pure white — its formulation is free of any pigment that could migrate into the marble. The risk of staining from the adhesive chemical is eliminated entirely.
What You Need Before You Start
The correct adhesive chemical
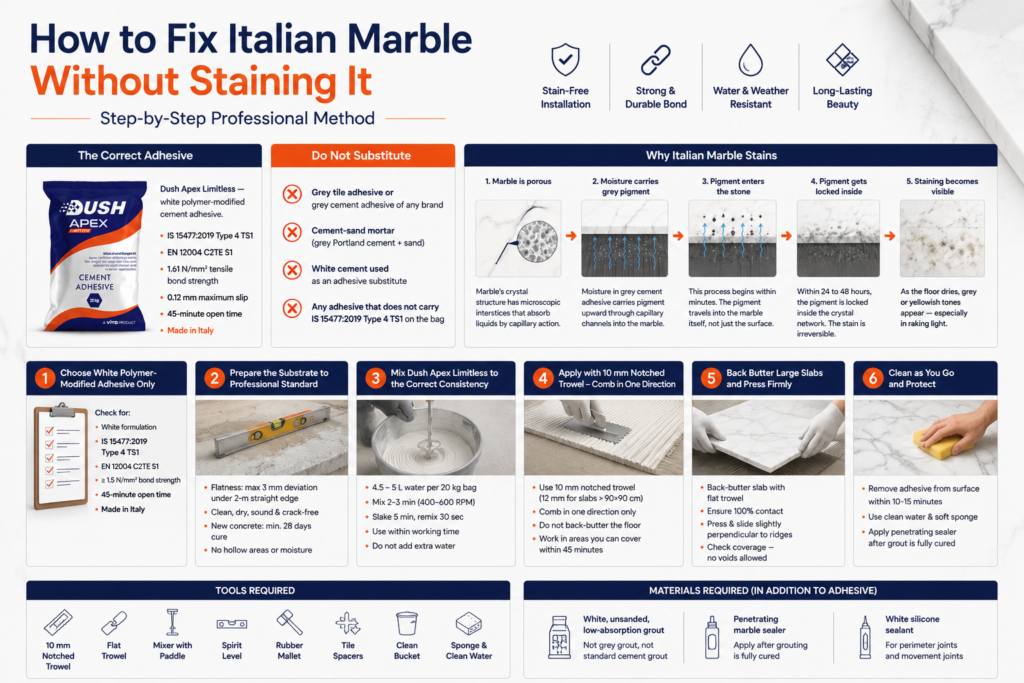
Dush Apex Limitless — white polymer-modified cement adhesive. IS 15477:2019 Type 4 TS1. EN 12004 C2TE S1. 1.61 N/mm² tensile bond strength. 0.12 mm maximum slip. 45-minute open time. Made in Italy.
Do not substitute with any of the following — regardless of cost savings, site availability, or a contractor’s habit:
- Grey tile adhesive or grey cement adhesive of any brand
- Cement-sand mortar (grey Portland cement + sand)
- White cement used as an adhesive substitute
- Any adhesive that does not carry IS 15477:2019 Type 4 TS1 on the bag
Tools required
- 10 mm notched trowel (12 mm for slabs above 90×90 cm)
- Flat trowel for back buttering
- Low-speed electric paddle mixer
- Spirit level (2-metre minimum)
- Rubber mallet
- Tile spacers matched to desired joint width
- Clean bucket for mixing
- Sponge and clean water for surface cleaning during installation
Materials required in addition to adhesive
- White, unsanded, low-absorption grout — not grey grout, not standard cement grout
- Penetrating marble sealer — apply after grouting is fully cured
- White silicone sealant — for perimeter joints at walls and any movement joints
Step 1 — Choose White Polymer-Modified Adhesive Chemical Only
The specification decision is made before anything is mixed or applied. Only white polymer-modified cement adhesive chemical rated IS 15477:2019 Type 4 TS1 is acceptable for Italian marble.
Check the bag before accepting it on site. Look for:
- The word white in the product description — not off-white, not cream, not light grey
- IS 15477:2019 Type 4 TS1 on the packaging or technical data sheet — the certification that now defines the baseline for every specification-grade marble project in India
- EN 12004 C2TE S1 — confirms European benchmark compliance for open time, anti-sag, and deformability
- A stated tensile bond strength in N/mm² — for Italian marble, this must be at least 1.5 N/mm²
- 45-minute open time — mandatory for large-format Italian marble slab installation
Dush Apex Limitless states all of these on its packaging: white formulation, IS 15477:2019 Type 4 TS1, EN 12004 C2TE S1, 1.61 N/mm², 45-minute open time, manufactured in Italy. A complete guide to evaluating white marble adhesive chemical options in India — and what separates a certified product from one that only appears white on the bag — is worth reading before any marble project begins.
If a contractor suggests using any grey adhesive — even one branded for marble or stone — refuse and specify Dush Apex Limitless by name. The additional cost over grey adhesive is negligible relative to the cost of Italian marble that stains.
Step 2 — Prepare the Substrate to Professional Standard
Italian marble is unforgiving of substrate problems. A hollow section beneath a marble slab concentrates stress at the unsupported edge — cracking the marble. A high spot creates a lippage difference between adjacent slabs that is impossible to correct without re-fixing. Getting the substrate right before any adhesive is applied prevents problems that no technique during installation can fix afterwards. How the substrate condition interacts with the fixing chemical — and the full preparation standard required for marble and natural stone in India — applies directly at this stage.
Flatness tolerance: Maximum 3 mm deviation under a 2-metre straight edge. Check in multiple directions across the entire floor area. Mark high spots and grind them down. Fill low spots with a self-levelling compound and allow to fully cure (follow manufacturer data sheet — typically 24 hours minimum).
Surface condition: The substrate must be:
- Structurally sound — no hollow sections, no delamination, no cracks in the screed
- Clean — free of all dust, curing compounds, paint, oil, grease, and any previous adhesive residue
- Dry — no rising damp, no free moisture on the surface
- Free of any surface treatments that could affect adhesion — sealer residue, wax, release agents
New concrete substrates must cure for a minimum of 28 days before tiling. Concrete continues to shrink as it cures — tiling on immature concrete creates bond failure as the substrate moves.
Existing substrates must be sounded for hollow sections by tapping with a hammer or metal rod. Any hollow section must be filled or the substrate section replaced. Do not tile over hollow screed — the marble will crack at that point under load.
Step 3 — Mix Dush Apex Limitless to the Correct Consistency
Adhesive performance depends as much on correct mixing as on the product formulation. A mix that is too wet has reduced tensile strength. A mix that is too dry does not spread correctly and loses contact with the marble back surface. Both result in a weaker bond than the product is designed to deliver.
Mixing procedure:
- Pour clean, cool water into the mixing bucket first — approximately 4.5 to 5 litres per 20 kg bag. Adjust slightly based on site temperature (warmer weather requires the lower end of the water range; cooler weather allows the higher end)
- Add Dush Apex Limitless powder gradually into the water while mixing — not the reverse
- Mix with a low-speed electric paddle mixer (400–600 RPM) for 2–3 minutes until completely smooth and lump-free
- Allow the mixed adhesive to slake for 5 minutes — this allows the polymer content to fully hydrate. Do not skip this step
- Remix briefly for 30 seconds before use
What correct consistency looks like: The mixed adhesive should hold its shape when a ridge is formed with the trowel, but spread smoothly without dragging. It should not flow or slump (too wet) and should not crumble or resist spreading (too dry).
Do not: Add extra water to a stiff mix. Do not retemper adhesive that has begun to stiffen in the bucket — discard it and mix fresh. Each 20 kg bag mixed at the correct ratio should be used within the working time.
Step 4 — Apply with 10 mm Notched Trowel — Comb in One Direction
Apply Dush Apex Limitless to the prepared substrate using a 10 mm notched trowel for Italian marble slabs up to 90×90 cm. For larger slab formats — 120×60 cm, 120×120 cm — use a 12 mm notched trowel to ensure sufficient adhesive depth under the heavier stone.
Application technique:
- Hold the trowel at a consistent 45–60° angle to the substrate surface
- Comb the adhesive in parallel ridges in one direction only — do not apply in circular or random strokes. Parallel ridges allow air to escape from beneath the marble slab as it is pressed into position, preventing trapped air pockets
- The ridges must be consistent height — the full 10 mm notch depth — across the entire application area
- Apply only the area you can tile within the 45-minute open time of Dush Apex Limitless. In hot Indian summer conditions (above 35°C), work in smaller sections — open time reduces in high heat
Critical warning — skinned adhesive: If the adhesive surface develops a dry skin before the marble is placed, that section cannot be tiled. Skinned adhesive has lost its open bonding surface. Scrape it off, apply fresh adhesive, and tile immediately. Placing Italian marble onto skinned adhesive is the most common cause of bond failure in marble installations — the slab appears fixed but pulls off within months.
Step 5 — Back Butter Every Marble Slab — Without Exception
Back buttering is the technique of applying adhesive chemical to the back face of the marble slab before pressing it into the adhesive bed on the floor. It is not optional for Italian marble. It is the step that separates an installation with 65–70% contact area (adequate for standard ceramic tiles) from one with 95–100% contact area (required for heavy marble slabs).
Why 95–100% contact matters for Italian marble:
Hollow sections beneath marble concentrate mechanical stress at the unsupported edges. Italian marble, despite its visual density, is brittle in thin sections — 18 mm Statuario does not distribute point loads across hollow areas. It cracks at them. A marble slab with a 30% hollow area will crack under normal floor loading within 2 to 5 years. With 100% contact, the same slab distributes load uniformly across the full adhesive bed and performs for decades.
Back buttering procedure:
- Place the marble slab back-face up on a clean surface or on padded trestles
- Apply a thin but complete skim coat of Dush Apex Limitless to the entire back face using a flat trowel
- The coat should fill any surface irregularities on the stone back — smooth for sawn marble, slightly textured for hand-finished or calibrated stone
- Do not allow the back butter coat to skin over before placing the slab. In hot conditions, apply and place immediately
- Press the back-buttered slab onto the combed adhesive bed on the floor
The two adhesive surfaces — the ridged floor bed and the flat back butter layer — merge as the slab is pressed and seated, creating a continuous, void-free bond across the full slab area.
Step 6 — Position Marble Within the 45-Minute Open Time — Never Slide
Dush Apex Limitless provides 45 minutes of open time from the moment the adhesive is applied to the substrate. This is the EN 12004 E (extended open time) classification — more than double the 20-minute window of standard tile adhesive.
45 minutes is the working window that large Italian marble slabs demand: time to place the slab, check alignment with the adjacent slab, verify the joint width with spacers, check level on all four edges with the spirit level, and make any adjustments — without rushing and without placing a slab onto an adhesive that has already begun to lose its open bonding surface.
Positioning technique:
- With the back-buttered slab held at a slight angle, lower the leading edge into position against the spacers of the previously laid slab
- Lower the slab flat onto the adhesive bed — do not drag or slide. Sliding marble across the adhesive surface disturbs the ridge pattern, reduces contact area, and can drag adhesive into the open joints where it may bleed upward to the marble face
- Press the slab firmly with both palms across the full surface area
- Use a rubber mallet to seat the slab completely — work systematically from the centre outward to the edges, not from one edge across. Tapping from one edge traps air under the centre
- Check level on all four edges and across the diagonal with a 2-metre spirit level
- Adjust position if needed — lift cleanly, reposition, and press again. Do not twist or slide the slab to adjust
Joint width: Use tile spacers of the specified width consistently. Italian marble is typically installed with 1.5 to 3 mm joints — narrower than ceramic tile. Consistent joint width requires spacer discipline, not estimation.
If the open time is exceeded: Do not place marble onto adhesive that has been applied for more than 45 minutes without testing. Press your thumb firmly onto the adhesive ridge — if the ridge does not deform easily and adhesive does not transfer cleanly to your thumb, the open time has been exceeded. Scrape the area back, apply fresh Dush Apex Limitless, and proceed.
Step 7 — Allow Full Cure Before Grouting
The final step is patience — and it is as important as any of the preceding six.
Curing timeline for Dush Apex Limitless under Italian marble:
| Milestone | Time after installation |
| Do not walk on marble | 24 hours |
| Do not wet the surface | 12 hours |
| Do not grout | 24 hours minimum |
| Light foot traffic permitted | 24 hours |
| Heavy furniture placement | 72 hours |
| Full structural load (commercial) | 72 hours |
| Outdoor marble — before rain exposure | 48 hours |
Grouting Italian marble — the second staining risk:
Grey cement grout is as dangerous to Italian marble as grey cement adhesive. The same pigment migration mechanism applies: grey grout in contact with the marble edge bleeds pigment into the stone face at and around the joint. After 24 hours adhesive cure, grout Italian marble with white, unsanded, low-absorption grout only — and for joints where stain resistance and long-term joint integrity matter as much as colour, a purpose-formulated grout chemistry goes considerably further than any cement-based alternative.
Before applying grout, consider sealing the marble face with a penetrating sealer. This creates a sacrificial barrier at the marble surface — it does not stop the grout application but prevents any grout bleed from penetrating the stone body. The sealer is applied, allowed to cure per the manufacturer’s instructions, and then grouting proceeds normally. After grouting is complete and fully cured, apply a second coat of penetrating sealer to the entire marble and joint surface.
Perimeter joints: At all walls, door frames, columns, and changes of plane, fill the joint with white silicone sealant — not grout. These are movement joints. Cement grout in perimeter positions cannot accommodate the structural movement that occurs at building interfaces, and will crack within months. White silicone allows movement while maintaining a clean joint line.
The Complete Anti-Staining Checklist — Before Installation Begins
Use this checklist on every Italian marble project before a single slab is placed:
- ☐ Adhesive chemical on site is confirmed white formulation
- ☐ Bag carries IS 15477:2019 Type 4 TS1 — both Type 4 and TS1 present
- ☐ Bag carries EN 12004 C2TE S1 — open time and deformability confirmed
- ☐ No grey adhesive, grey mortar, or white cement present on site for marble use
- ☐ Substrate is level to 3 mm under 2-metre straight edge
- ☐ Substrate is clean, dry, and structurally sound — hollow sections resolved
- ☐ 10 mm (or 12 mm for large slabs) notched trowel confirmed on site
- ☐ Flat trowel for back buttering confirmed on site
- ☐ White, unsanded grout confirmed on site — no grey grout
- ☐ Penetrating marble sealer available for post-grouting application
- ☐ White silicone available for perimeter joints
- ☐ All team members briefed: no sliding of marble, no grey adhesive substitution
Frequently Asked Questions — How to Fix Italian Marble Without Staining
How do I fix Italian marble without staining it?
Use white polymer-modified adhesive chemical only — IS 15477:2019 Type 4 TS1. Never grey cement or cement-sand mortar. Prepare substrate to 3 mm flatness. Mix Dush Apex Limitless correctly. Apply with 10 mm notched trowel. Back butter every slab. Position within 45-minute open time — do not slide. Allow 24 hours before grouting. Use white unsanded grout. Seal the marble after grouting.
What causes Italian marble to stain during installation?
Grey cement adhesive or cement-sand mortar applied as the fixing chemical. Grey cement contains iron oxide pigments that are drawn by capillary action into marble’s micro-porous crystal structure before the adhesive cures. Once inside the stone, the pigment is permanent — no cleaning or polishing removes it. Dush Apex Limitless white polymer-modified adhesive contains no grey pigment and eliminates this risk entirely.
Can Statuario marble be fixed without staining risk?
Yes — using Dush Apex Limitless white polymer-modified adhesive, IS 15477:2019 Type 4 TS1. Statuario is the highest-risk marble for grey staining due to its near-translucent quality. White polymer-modified adhesive is non-negotiable for Statuario. Grey adhesive is visible through the slab surface, not just at joints. There is no safe grey adhesive for Statuario marble.
Does the grout choice affect Italian marble staining?
Yes. Grey cement grout bleeds pigment into marble face at joint edges. Always use white, unsanded, low-absorption grout for Italian marble. Seal the marble surface with penetrating sealer before grouting in porous marble varieties. Use white silicone at all perimeter joints — never cement grout at walls.
What is the curing time for Italian marble adhesive?
24 hours before grouting and light foot traffic. 72 hours before heavy furniture or full structural load. Do not wet the surface within 12 hours of installation. Outdoor Italian marble: 48 hours before rain exposure or foot traffic.
Which adhesive chemical is best for fixing Italian marble in India?
Dush Apex Limitless — white polymer-modified cement adhesive, manufactured in Italy, IS 15477:2019 Type 4 TS1 and EN 12004 C2TE S1 certified. 1.61 N/mm² tensile bond strength. 0.12 mm maximum slip. 45-minute open time. Suitable for Statuario, Carrara, Calacatta, Botticino, Emperador, and all Italian marble on floors and walls in India. Available at dushproducts.com/products/dush-apex-limitless.
Conclusion
Italian marble staining is not a risk that can be managed during installation — it is a risk that is either eliminated before installation begins or accepted as a permanent outcome. The decision that eliminates it is the adhesive chemical specification: white polymer-modified cement adhesive, IS 15477:2019 Type 4 TS1, every time, without exception.
Dush Apex Limitless — manufactured in Italy, dual-certified to IS 15477:2019 Type 4 TS1 and EN 12004 C2TE S1, delivering 1.61 N/mm² tensile bond strength and a 45-minute open time — is the adhesive chemical that removes staining risk from Italian marble installation in India. Follow the seven steps in this guide with Dush Apex Limitless and Italian marble installs without staining, without bond failure, and without the regret that comes from a grey adhesive chosen to save a few hundred rupees on a project worth lakhs.
For technical data sheets, product certification documents, and availability in India, visit dushproducts.com.