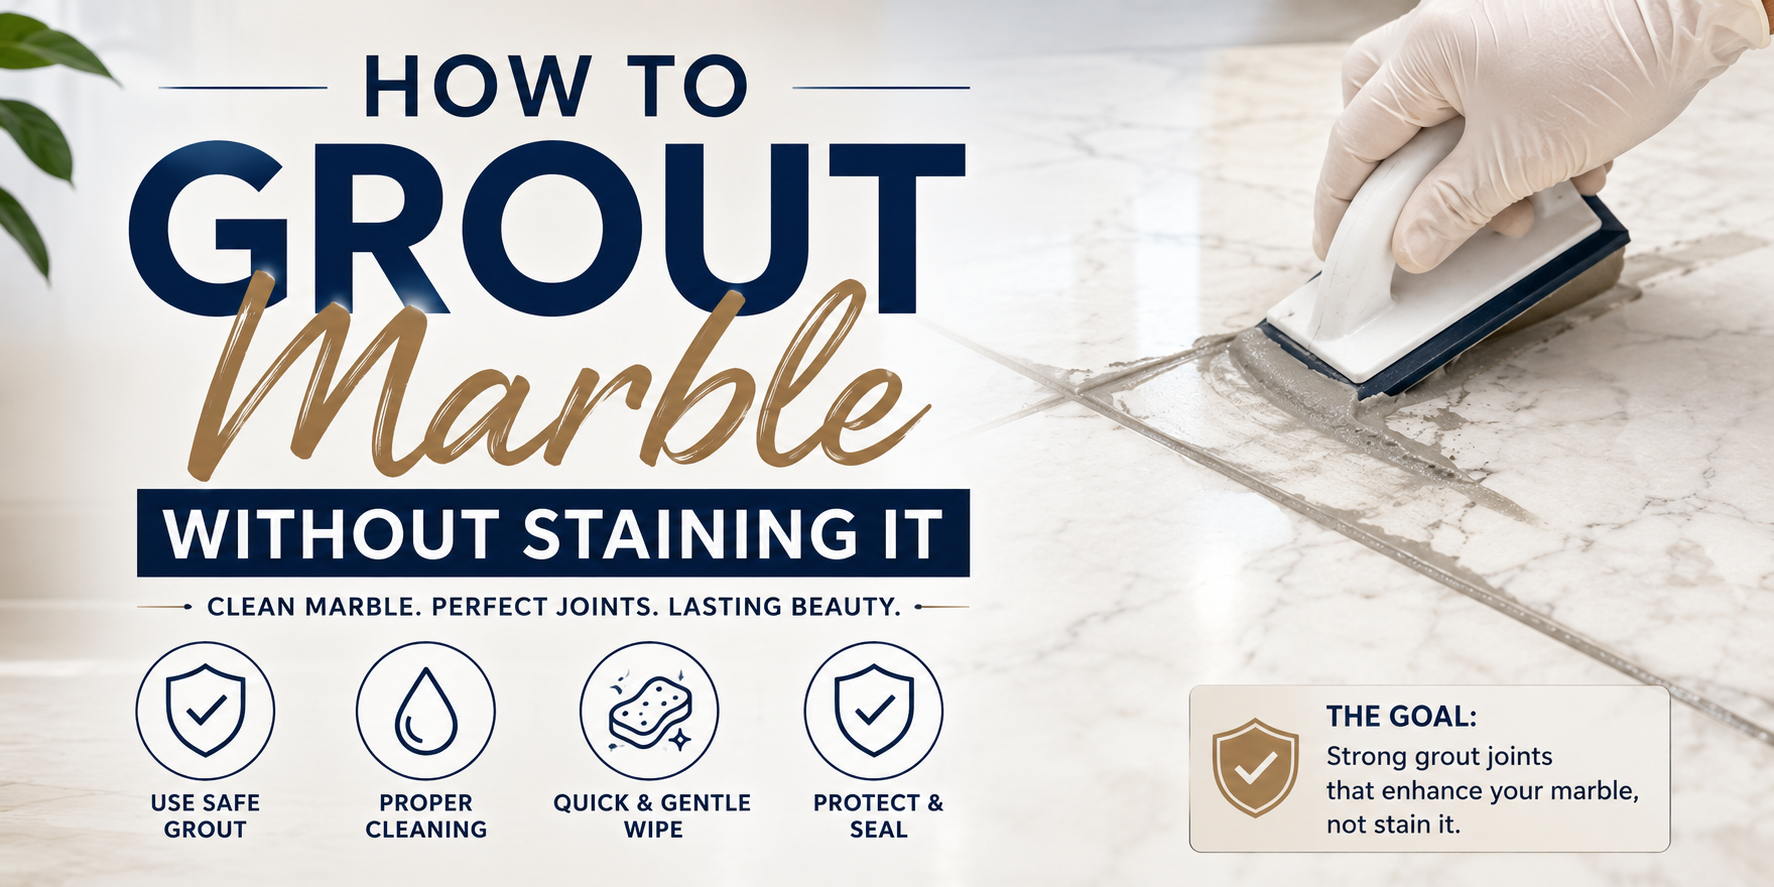
Grouting marble without staining it requires the correct grout product, a pre-grouting sealer coat on the marble surface, the correct application technique, and immediate cleaning before grout haze sets. Each step is non-optional. Skipping any one of them risks staining that is visible for the life of the installation.
Why Grouting Marble Carries the Same Staining Risk as Adhesive
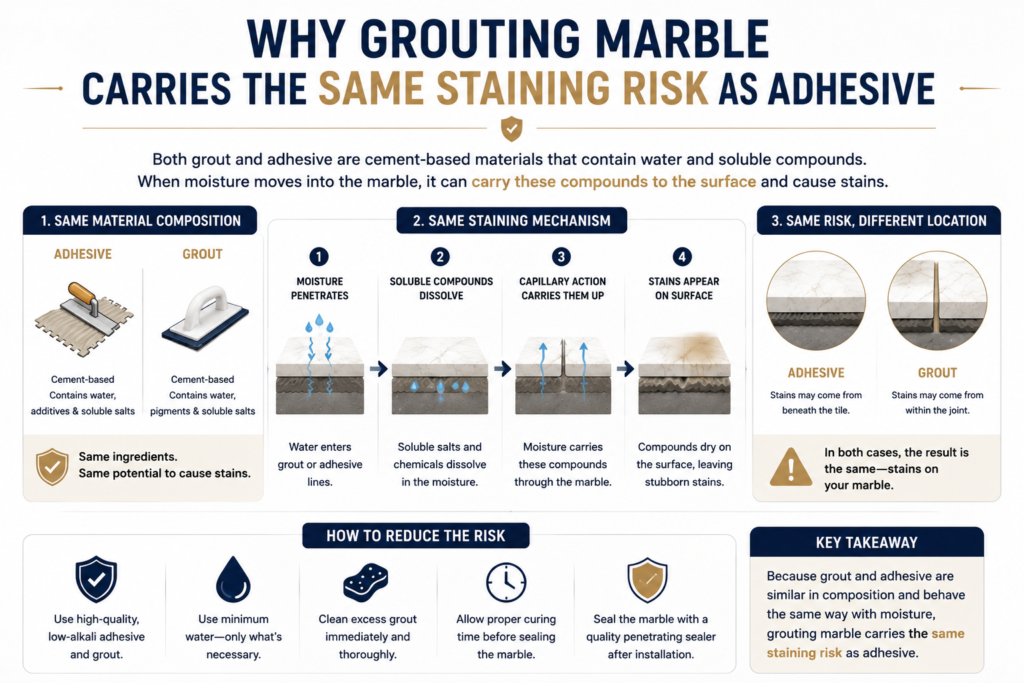
The Capillary Mechanism at Grout Joints
Marble’s micro-porous crystal structure does not distinguish between grey adhesive below the slab and grey grout at the joint face. In both cases, the mechanism is identical: dissolved iron oxide pigment from grey Portland cement is drawn into marble’s capillary channels by the same moisture-driven absorption that makes porous materials absorb liquids. At the adhesive interface, migration is upward through the slab soffit. At the grout joint, migration is sideways through the cut face of the marble into the crystal network of the stone edge.
Grout is typically applied wet and under pressure — pushed into joints with a grout float, deliberately forced into contact with the marble face. This applied pressure drives wet grout chemistry directly against the marble’s exposed crystal structure at the joint face, accelerating pigment migration compared to the passive capillary action that occurs beneath an adhesive-covered slab. The full physics of why marble’s crystal structure makes it permanently vulnerable to cement pigment migration at every surface it contacts — including grout joints is the technical foundation of the grouting precautions in this guide.
Why Grey Grout Is as Dangerous as Grey Adhesive
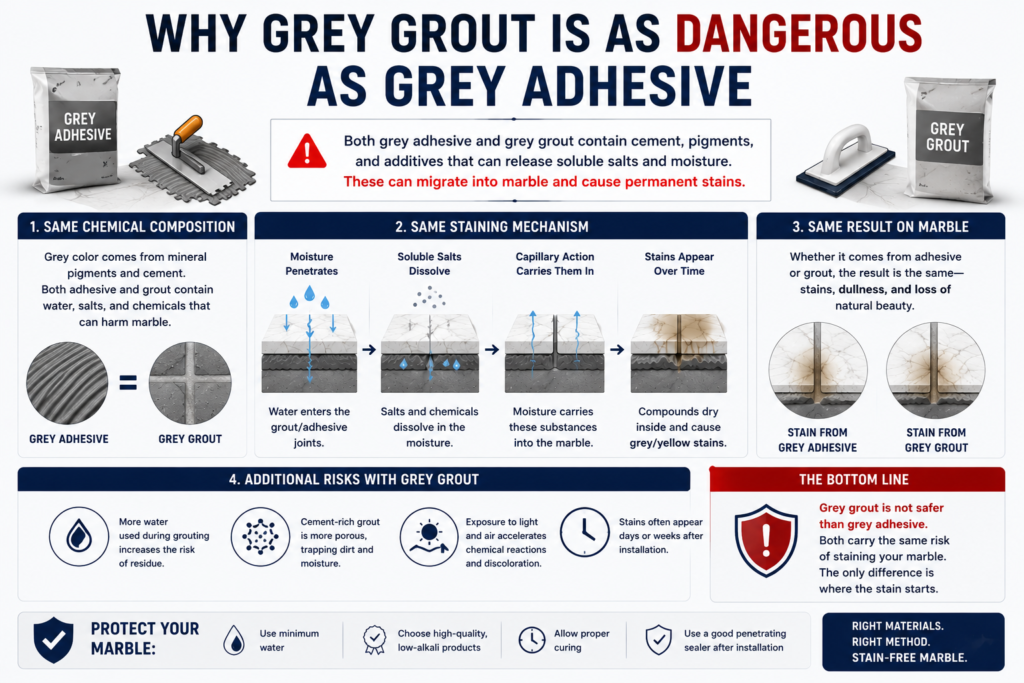
Grey cement grout contains the same iron oxide and manganese compounds as grey cement adhesive. At the exposed marble joint face, these compounds have direct, pressure-assisted access to the marble’s crystal structure. The grey fringe that appears around each marble tile after grey grouting — a band of grey discolouration at every joint edge — is structurally identical to the grey caused by adhesive: permanent, inside the crystal structure, not on the surface, and not responsive to cleaning.
On Statuario and Calacatta, the grey fringe from grey grout is stark and immediately visible. On Carrara, the natural grey veining partially masks it — but on inspection, the grout-induced grey is clearly distinct from the natural veining pattern. On light Indian marble varieties, the effect is equivalent.
Choosing the Right Grout for Marble
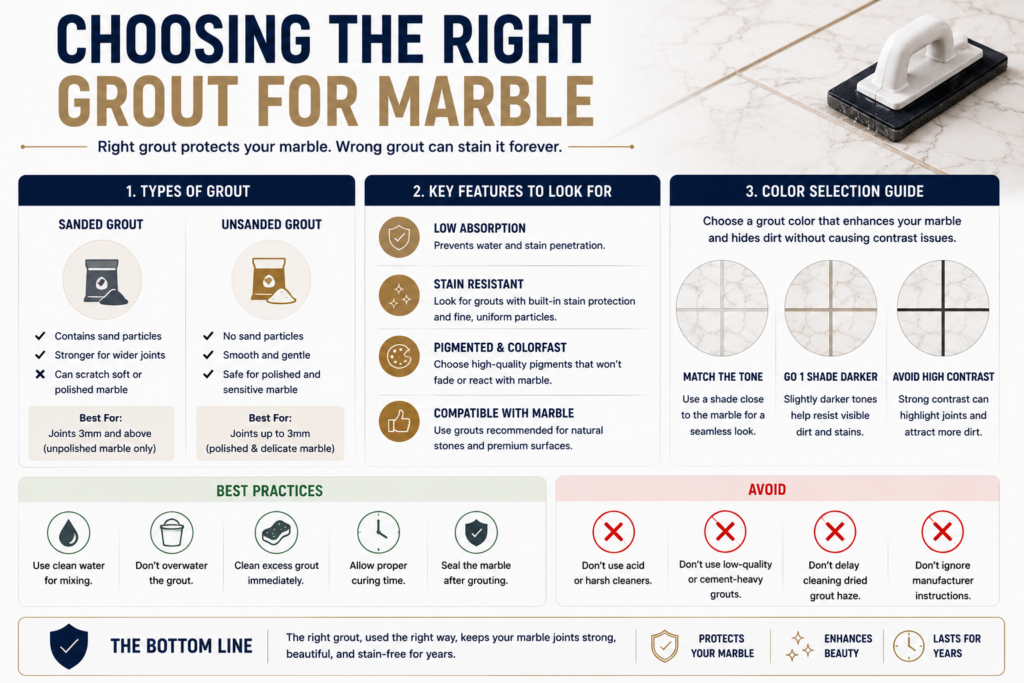
White Unsanded Cement Grout
White cement grout — without coarse aggregate — is the minimum acceptable specification for marble joints. White formulation means no iron oxide content: no grey pigment to bleed into the marble at joint faces. Unsanded means no coarse aggregate that would scratch the polished marble surface during application. For marble joints up to 3 mm wide — the standard specification for Italian marble — white unsanded grout is appropriate.
White cement grout is still porous, however. Over time in wet areas, it absorbs water, stains, and can develop mold growth in grout lines. It requires regular sealing and re-grouting at intervals of 5 to 8 years in bathroom and wet area applications.
Epoxy Grout — The Professional Specification
Epoxy grout — a two-component system of resin and hardener mixed on site — is the professional specification for marble grouting. Its near-zero porosity means no moisture penetrates the grout joint to reach the adhesive bed beneath, no staining from cleaning chemicals or cooking grease occurs at the joint, and no mold or mildew grows in the joint over time. For marble in kitchens, bathrooms, outdoor terraces, and pool surrounds, epoxy grout extends joint life significantly beyond cement grout alternatives while eliminating the re-grouting requirement.
Epoxy grout is available in white and a range of light colours appropriate for Italian marble — white, ivory, and light grey epoxy grout all provide non-staining joint options. The application technique requires more care than cement grout — epoxy sets faster and must be cleaned from the marble surface promptly — but the long-term performance advantage for marble installations is significant.
What to Avoid
Grey cement grout — any grey-toned cement grout regardless of brand or claimed quality — must never be used on white or light marble. Standard sanded grout must not be used on polished marble — the coarse aggregate scratches the polished surface during application. Rapid-setting cement grout must not be used on marble — the accelerated setting chemistry increases the rate of pigment migration before cleaning can begin.
Before You Grout — Sealing the Marble Surface First
Why Pre-Grouting Sealer Is Essential
Even with white grout, cement grout haze — the thin film of cement particles left on the marble surface after grout application and cleaning — can penetrate the marble surface if the stone is unsealed. Pre-grouting sealer creates a temporary sacrificial barrier at the marble surface: it does not prevent grouting, but it prevents grout particles and residue from penetrating the marble body during application and cleaning. The sealer absorbs the grout residue rather than the marble.
For porous marble varieties — Statuario, Carrara, light Indian marble — pre-grouting sealer is essential. For denser marble like Emperador, it is strongly recommended. Skipping the pre-grouting sealer to save time is the most common cause of grout haze becoming permanently embedded in the marble surface after a grouting attempt.
How to Apply Pre-Grouting Sealer

Apply penetrating marble sealer to the fully cured tile surface after adhesive cure is complete (minimum 24 hours after installation) and before grout is mixed. Use a clean cloth or foam applicator — apply a thin, even coat across the full tile surface and into joint edges. Allow the sealer to penetrate for the time specified in the manufacturer instructions — typically 15 to 30 minutes. Buff off any surface excess with a clean dry cloth before the sealer cures on the surface. Allow the sealer to cure fully — minimum 2 to 4 hours — before beginning grouting.
Step-by-Step: How to Grout Marble Without Staining
Step 1 — Wait for Full Adhesive Cure
Grout only after a minimum 24-hour cure from the completion of tile installation. Grouting before the adhesive has reached adequate set traps moisture in the adhesive bed — in outdoor marble and wet area applications, this moisture cannot escape once the grout seals the joints. For outdoor marble terraces and pool surrounds, allow 48 hours before grouting.
Step 2 — Remove Tile Spacers and Clean Joints
Remove all tile spacers before grouting. Use a grout saw or vacuum to remove any adhesive squeeze-out from the joints — the joint depth should be at least two-thirds of the tile thickness for adequate grout bond. Wipe the joint faces with a barely damp cloth to remove dust without adding excess moisture.
Step 3 — Apply Pre-Grouting Sealer
As described above — apply penetrating sealer, allow penetration time, buff excess, and allow minimum 2 to 4 hours cure before proceeding to grouting.
Step 4 — Mix and Apply Grout in Sections
Mix white unsanded grout or prepare epoxy grout components to the manufacturer’s specified ratio. Work in sections of 1 to 2 sqm — never apply grout to the entire floor before beginning cleaning. Apply grout diagonally across the tile joints using a rubber grout float, pressing firmly into the joint to achieve full depth. Avoid dragging the float parallel to the joint direction — diagonal movement fills joints more completely. For epoxy grout, work in smaller sections (0.5 to 1 sqm) as epoxy sets faster than cement grout and the cleaning window is shorter.
Step 5 — Clean Grout Haze Immediately
This is the most time-critical step. Grout haze left on marble hardens progressively — after 30 minutes it begins to set, and after 2 hours it becomes difficult to remove without risking the marble surface. Wipe the grouted section with a barely damp (not wet) clean sponge in a circular motion, rinsing the sponge frequently in clean water. Change the water every 2 to 3 sqm — dirty water re-deposits grout particles on the marble surface. A second pass with a clean barely damp cloth removes residual haze. Do not use acidic cleaners to remove grout haze from marble — acid removes grout haze but etches the marble surface permanently.
Step 6 — Perimeter Joints — Silicone, Not Grout
At all perimeter positions — where the marble field meets walls, skirting, cabinets, door frames, and step edges — fill with white neutral-cure silicone sealant, not grout. These are movement joints: the building structure moves at these junctions, and cement grout cracks under this movement within months. Neutral-cure silicone (not acetoxy/acid-cure, which can stain marble) maintains a clean, flexible joint line at all perimeters. Apply silicone after grout has cured, using masking tape on both sides of the joint for a clean line.
Step 7 — Post-Grouting Sealer
After grout has fully cured — minimum 48 to 72 hours for cement grout, 24 hours for epoxy grout — apply a second coat of penetrating marble sealer to the full marble and grout surface. This post-grouting coat protects both the marble and the grout joints from moisture penetration, staining, and cleaning chemical absorption in the months before the first planned re-sealing.
Marble Variety-Specific Grouting Considerations

Statuario and Calacatta
Statuario and Calacatta have the most open crystal structures of any Italian marble — and the highest grouting staining risk. Pre-grouting sealer is non-negotiable for both varieties. Epoxy grout is the professional recommendation. The variety-specific grouting and fixing requirements for Statuario, Carrara, and Emperador — and where each variety’s vulnerability is highest during the grouting stage establishes the grouting precautions specific to each Italian marble variety.
Carrara
Carrara’s natural grey veining provides marginal visual tolerance for light grout residue in the slab body — but not at joint faces where grout is in direct contact with the cut marble. Clean grout haze from Carrara immediately and thoroughly. Carrara is frequently used in wet areas (bathrooms, kitchens) where epoxy grout’s moisture resistance provides a significant long-term advantage over cement grout.
Emperador
Dark Emperador marble has lower visual risk from grey grout bleed at the slab body — but efflorescence from cement grout moisture migration can appear as white mineral deposits on the dark surface over time. White epoxy grout eliminates this efflorescence risk entirely by preventing moisture migration through the joint. For Emperador feature walls and bathroom applications, epoxy grout is strongly recommended.
Common Grouting Mistakes That Stain Marble
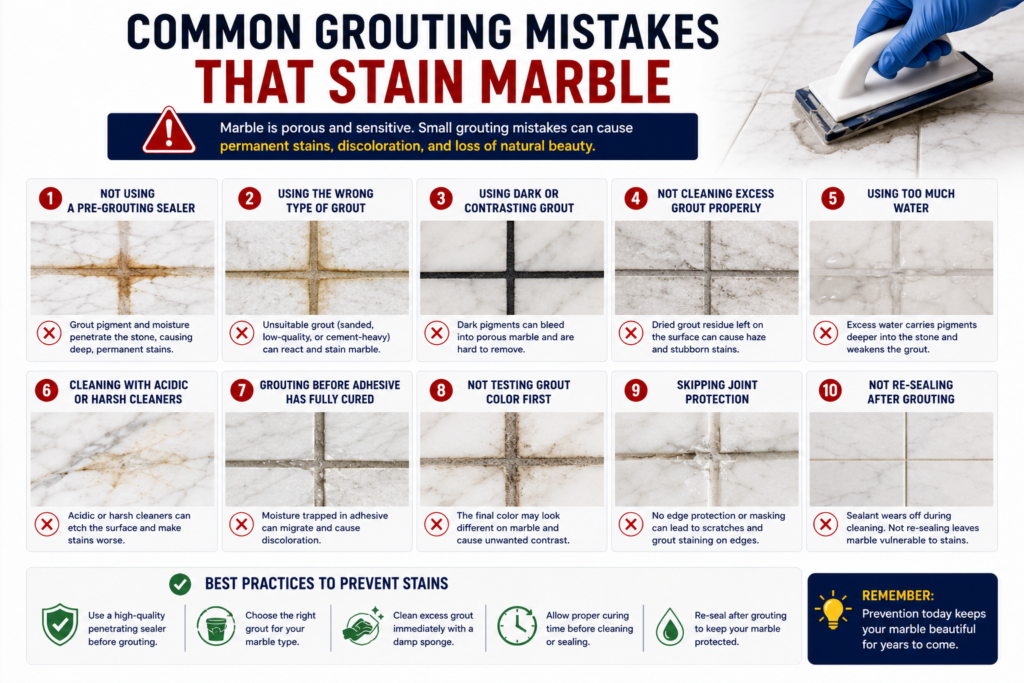
Using grey grout. The most damaging and most common mistake. Grey cement grout bleeds iron oxide into marble joint faces permanently. Always white, always unsanded for marble joints.
Skipping pre-grouting sealer. Grout haze on unsealed marble penetrates the surface. Apply penetrating sealer before grouting on every marble installation — no exceptions.
Leaving grout haze too long. After 30 minutes, cement grout haze begins hardening. Clean each section within 15 to 20 minutes of application. Never grout the entire floor and then clean — by the time cleaning begins, the first sections grouted have set grout haze on the marble.
Using acidic haze cleaners. Acid-based grout haze removers dissolve grout residue efficiently — and etch marble simultaneously. They are appropriate for ceramic and porcelain tile but permanently damage marble polish. Use only pH-neutral grout haze cleaners specifically rated for natural stone.
Grouting perimeter joints. Cement grout at perimeter positions cracks within the first thermal cycle. Use silicone sealant at all perimeters and movement joints.
Frequently Asked Questions — Grouting Marble
What Is the Best Grout for Italian Marble in India?
White epoxy grout is the professional specification for Italian marble — non-porous, non-staining, chemically resistant, and stain-resistant. For residential marble flooring where epoxy grout is not specified, white unsanded cement grout with pre-grouting sealer applied before grouting is the minimum acceptable alternative.
How Long Should I Wait Before Grouting Marble?
Minimum 24 hours after tile installation for indoor marble. Minimum 48 hours for outdoor marble, bathroom marble, and large format marble installations. Grouting before adequate adhesive cure traps moisture in the adhesive bed.
Can Grey Grout Be Used on Dark Marble Like Emperador?
No. Grey cement grout causes efflorescence on Emperador — white mineral deposits from cement alkalinity migrating through the dark stone. White grout — unsanded cement or epoxy — is mandatory for all marble varieties regardless of stone colour. White epoxy grout is the professional specification for Emperador, particularly in feature wall applications.
How Do I Remove Grout Haze from Marble?
Use a barely damp clean sponge in circular motion, changed water frequently. Work within 15 to 20 minutes of grout application on each section. For hardened grout haze, use a pH-neutral grout haze remover specifically rated for natural stone — never acidic grout haze cleaners, which etch marble permanently. Apply pre-grouting sealer before grouting to prevent haze penetration — this makes cleaning significantly easier.
Do I Need to Seal Marble Before Grouting?
Yes — pre-grouting penetrating sealer is essential for all marble. It creates a surface barrier that prevents grout residue from penetrating the marble during application and cleaning. Apply sealer, allow penetration time, buff off excess, and allow minimum 2 to 4 hours cure before grouting begins.