What Is Tile Adhesive?
Definition and Purpose
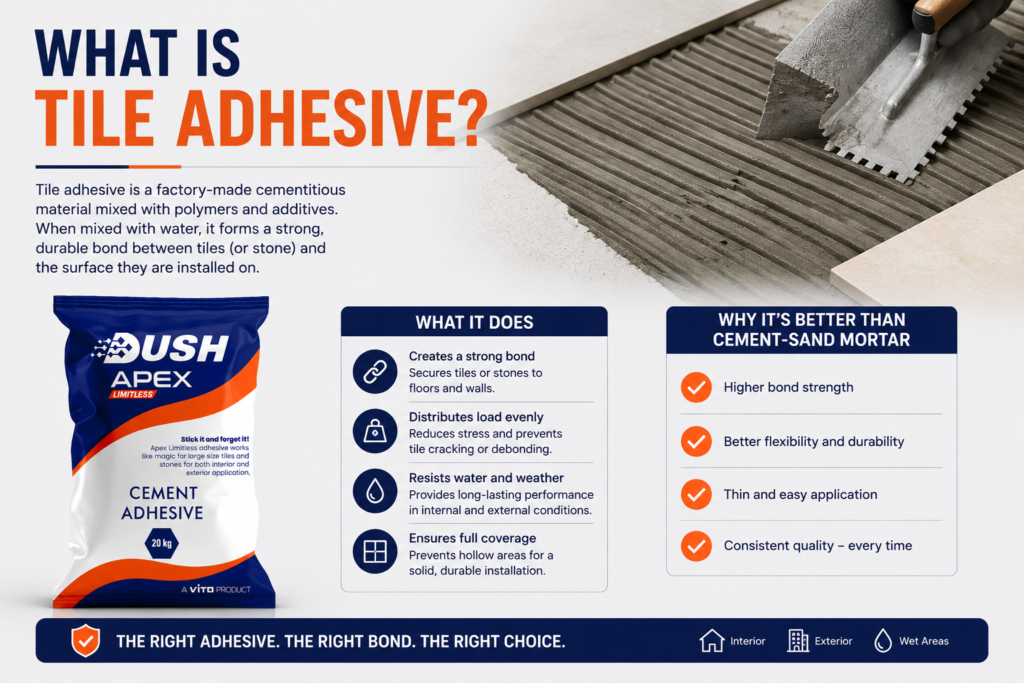
Tile adhesive is a factory-manufactured bonding compound used to fix ceramic, porcelain, stone, and glass tiles to floor and wall surfaces. It creates a structural bond between the tile and the substrate — the concrete, screed, or plaster beneath — that holds the tile in position under mechanical load, moisture exposure, and thermal movement for the life of the installation.The bond that tile adhesive creates is not simply mechanical interlocking. Modern polymer-modified tile adhesive forms a chemical bond between adhesive polymer chains and both the tile back surface and the substrate — a bond that is measurably stronger, more flexible, and more moisture-resistant than the mechanical interlocking of traditional site-mixed mortar.
How Tile Adhesive Differs from Traditional Cement Mortar
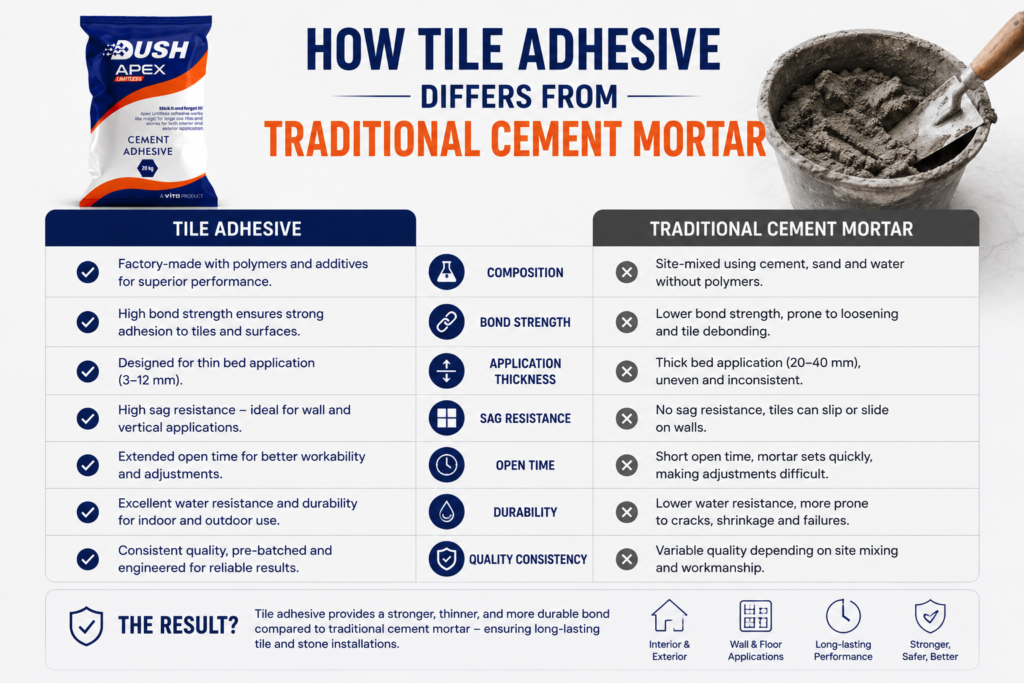
Traditional cement-sand mortar — ordinary Portland cement mixed with coarse sand at 1:3 or 1:4 ratio on site — was the standard tile fixing method in India for decades. It bonds tiles by mechanical interlocking and basic chemical adhesion. It has no polymer content, no classified tensile bond strength, no anti-sag capability, no extended open time, and no certified performance standard under IS 15477:2019.Modern polymer-modified tile adhesive is factory-manufactured to a consistent formulation. Every bag delivers the same polymer content, the same water-to-powder ratio, and the same performance parameters. The full performance comparison between polymer-modified adhesive, cement-sand mortar, and white cement — including the tested tensile strength figures and why cement mortar is no longer adequate for modern tile formats — explains why the Indian construction market has moved decisively away from site-mixed mortar for premium installations.
Key Components of Modern Tile Adhesives
Polymer-modified tile adhesive contains three functional components working together. The cement base — white or grey Portland cement — provides the primary bonding chemistry and compressive strength. Fine silica aggregate fills the matrix and controls workability. Polymer additives — typically acrylic or EVA (ethylene vinyl acetate) — are the component that transforms basic cement chemistry into high-performance adhesive: they create the chemical bond with tile and substrate surfaces, add flexibility to the cured adhesive bed, and significantly improve water resistance throughout the adhesive layer.
Why Kitchens Require Specialized Tile Adhesives
Exposure to Moisture and Water Splashes
Indian kitchens generate continuous moisture — steam from cooking, water from cleaning, condensation on cold surfaces, and daily mopping of floors. Standard cementitious adhesive absorbs moisture progressively, softening the adhesive bed over time. In kitchen environments, this moisture exposure is not occasional — it is daily and cumulative over years.Polymer-modified tile adhesive has a dense polymer matrix that resists water absorption throughout the adhesive layer. The EN 12004 C2 classification (improved adhesive) confirms elevated polymer content and moisture resistance. For kitchen tile installation in India, polymer-modified adhesive classified EN 12004 C2 is the minimum standard — not a premium option.
Heat and Temperature Changes
Kitchen floors and walls near cooking zones experience temperature fluctuations that standard tile adhesive is not formulated to handle. The tile, the adhesive bed, and the concrete substrate each expand and contract at different rates with temperature change. Over time, this differential thermal movement — if the adhesive cannot flex — cracks the bond, creates hollow sections beneath tiles, and eventually causes debonding.Polymer-modified adhesive with EN 12004 S1 deformability classification accommodates up to 2.5 mm of lateral movement without cracking the bond — providing the flexibility that kitchen thermal cycling demands over the installation’s life.
Heavy Foot Traffic on Kitchen Floors
Kitchen floors in Indian homes sustain concentrated foot traffic — often with hard footwear on stone or ceramic — in a relatively small area. The adhesive bond beneath kitchen floor tiles must maintain structural integrity under sustained load, repeated impact, and the point loads created by chair legs, appliance feet, and dropped objects.Dush Apex Limitless delivers a tested tensile bond strength of 1.61 N/mm² under IS 15477:2019 Type 4 TS1 — independently verified by laboratory testing, not by a manufacturing estimate. This is the structural figure that determines whether the bond holds under kitchen floor conditions for a decade or delaminating within years.
Grease, Cleaning Chemicals, and Daily Wear
Kitchen environments expose grout lines and tile surfaces to cooking oil, acidic cleaning agents, alkaline detergents, and abrasive scrubbing. While these primarily affect the grout and tile surface, cleaning chemicals that penetrate compromised grout lines reach the adhesive bed and can degrade non-polymer adhesive over time. Polymer-modified adhesive’s water-resistant matrix resists chemical penetration at the adhesive layer, maintaining bond performance in kitchen cleaning environments.
Types of Tile Adhesives Used in Kitchens
Cement-Based Tile Adhesive
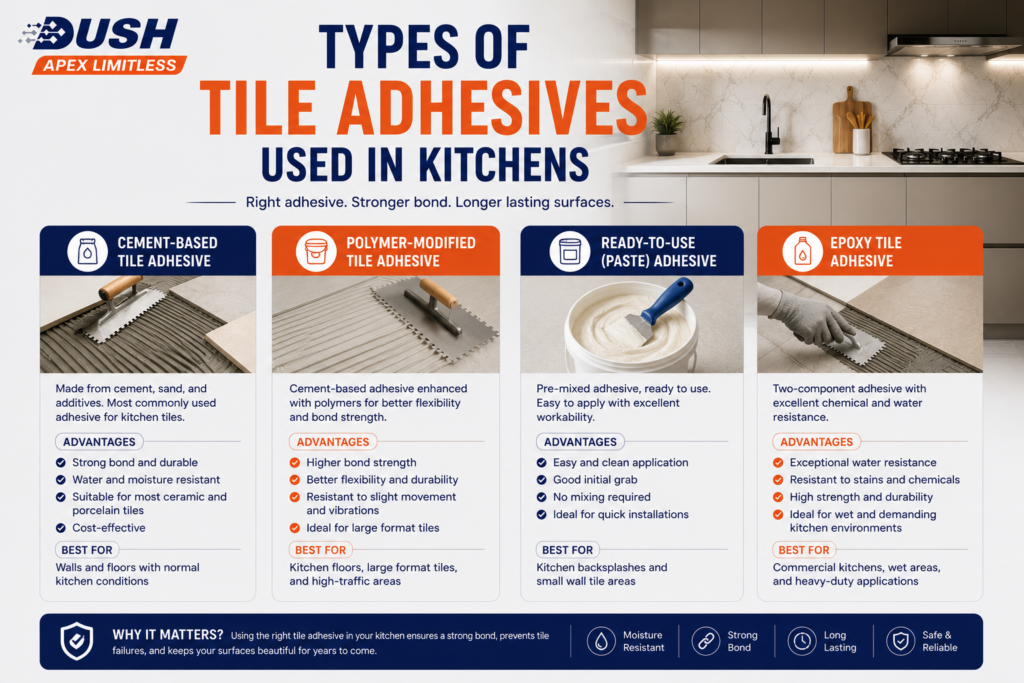
Cement-based tile adhesive — IS 15477:2019 Type 1 or Type 2 — is the basic category: Portland cement with fine aggregate and minimal or no polymer content. Type 1 is suitable for standard ceramic tiles in dry indoor applications. It is not suitable for kitchen wall tiles (no anti-sag classification), not suitable for large format kitchen floor tiles (insufficient open time and tensile strength), and not suitable for wet kitchen environments where daily moisture exposure is the norm.
Ready-Mix Tile Adhesive
Ready-mix tile adhesive is supplied as a pre-mixed paste in buckets — no water addition required on site. It is convenient for small repairs and DIY applications but has significant limitations for kitchen projects: shorter shelf life once opened, lower bond strength than polymer-modified powder adhesive, and limited suitability for large format tiles or wet environments. For professional kitchen tile installation in India, powder-format polymer-modified adhesive consistently outperforms ready-mix on bond strength and durability.
Epoxy Tile Adhesive
Epoxy tile adhesive is a two-component system — resin and hardener mixed on site — producing an extremely high bond strength (3.5 N/mm² and above) and near-total chemical resistance. It is suitable for commercial kitchen environments, food processing areas, and industrial flooring exposed to aggressive chemicals. For residential Indian kitchens, epoxy adhesive is generally overspecified and significantly more expensive than polymer-modified adhesive. It also has a shorter working time and requires more precise application technique. For most Indian residential kitchen projects, polymer-modified IS 15477:2019 Type 4 TS1 adhesive delivers more than adequate performance at a practical cost.
Polymer-Modified Tile Adhesive
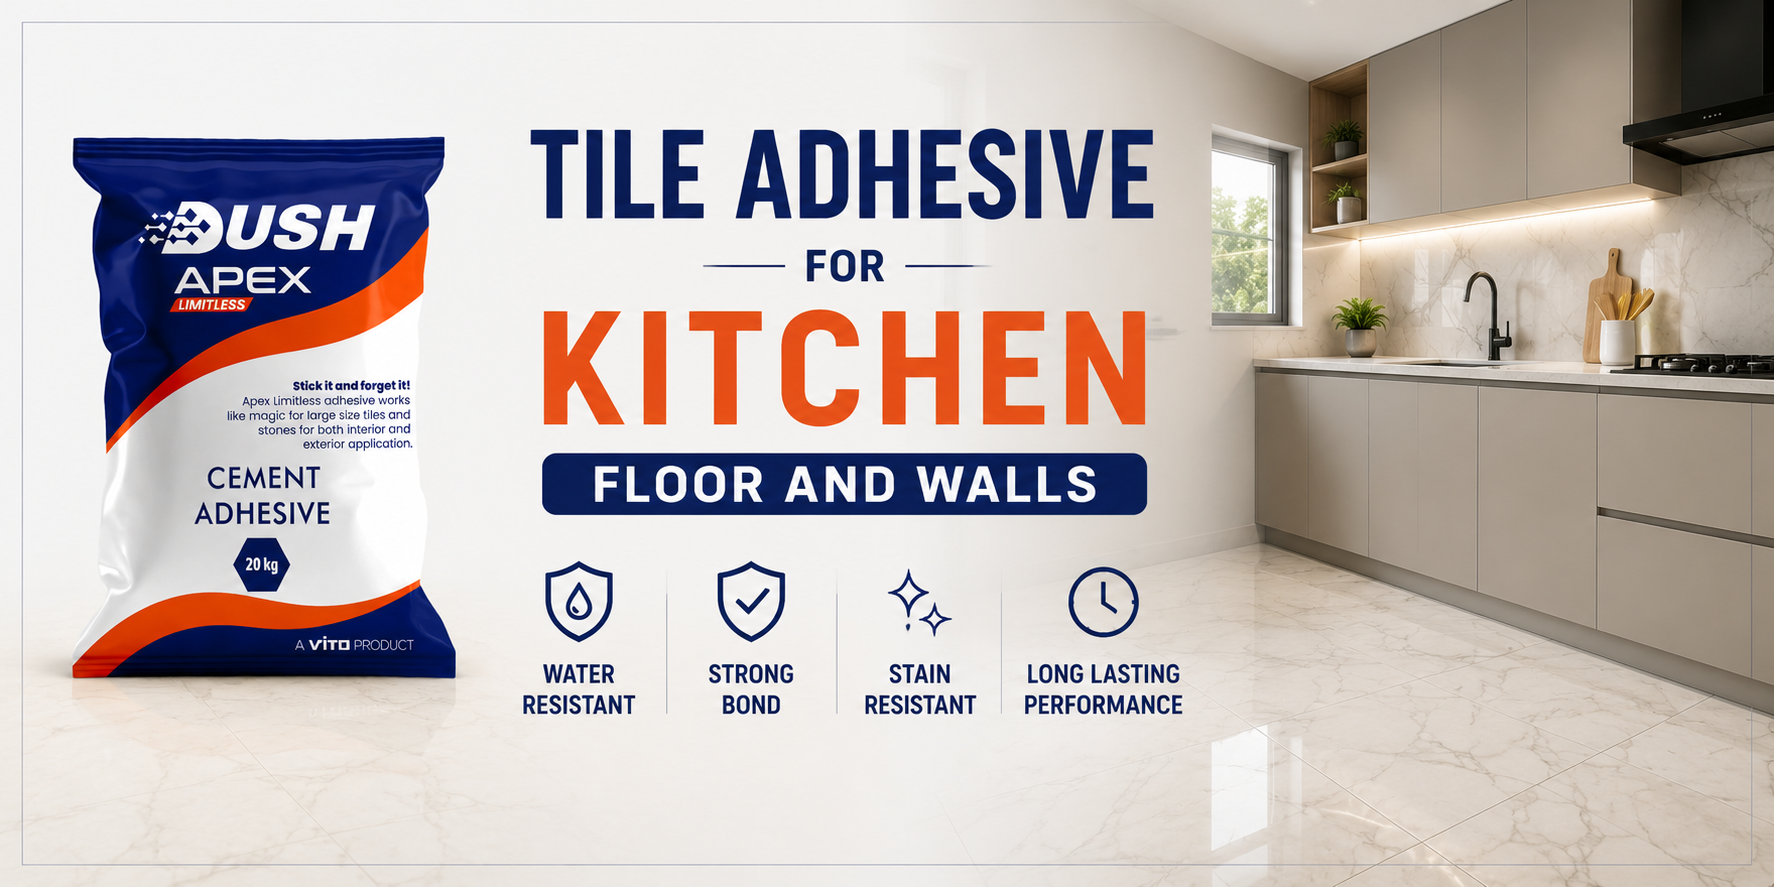
Polymer-modified tile adhesive — IS 15477:2019 Type 4 — is the professional specification for kitchen tile installation in India. Elevated polymer content (acrylic or EVA) delivers higher tensile bond strength, water resistance, flexibility, and open time than basic cementitious alternatives. EN 12004 C2TE S1 classification confirms: improved bond strength (C2), anti-sag for wall tiles (T), extended 45-minute open time (E), and deformability for thermal movement (S1).Dush Apex Limitless is a white polymer-modified tile adhesive manufactured in Italy, certified IS 15477:2019 Type 4 TS1 and EN 12004 C2TE S1. It is the single-product specification for kitchen floors, kitchen walls, backsplashes, and any marble or stone surface in the kitchen — white formulation ensures no staining risk on cream, light, or veined kitchen tiles.
Best Tile Adhesive for Kitchen Floor Tiles
Recommended Adhesive Properties
For kitchen floor tiles in India, the adhesive must meet these minimum properties: IS 15477:2019 Type 4 TS1 classification, minimum 1.5 N/mm² independently tested tensile bond strength, EN 12004 C2 moisture resistance, and EN 12004 E extended open time for tiles above 40×40 cm. For marble or light stone kitchen floors, white formulation is additionally required.Dush Apex Limitless meets every criterion: IS 15477:2019 Type 4 TS1, 1.61 N/mm² tensile, EN 12004 C2TE S1, white formulation, 45-minute open time.
Suitable Adhesives for Ceramic Floor Tiles
Standard ceramic kitchen floor tiles up to 40×40 cm can be fixed with IS 15477:2019 Type 2 adhesive in dry applications — but Type 4 is the professional recommendation even for ceramic, given kitchen moisture exposure and the marginal cost difference between Type 2 and Type 4. For ceramic tiles in wet kitchen zones (near sink, dishwasher area), EN 12004 C2 classification is required. Dush Apex Limitless covers all ceramic kitchen floor applications.
Suitable Adhesives for Porcelain Floor Tiles
Porcelain tiles have a vitrified, low-absorption back surface that demands higher bond strength from the adhesive than standard ceramic. The adhesive must bond to a surface that offers less mechanical interlocking than unglazed ceramic. IS 15477:2019 Type 4 TS1 polymer-modified adhesive is the correct specification for all porcelain kitchen floor tiles — the polymer chain chemistry creates the chemical bond that compensates for porcelain’s low-absorption back surface. Dush Apex Limitless is suitable for all porcelain kitchen floor formats.
Suitable Adhesives for Large Format Tiles
Large format kitchen floor tiles — 60×60 cm, 80×80 cm, 120×60 cm — are increasingly the standard specification in Indian residential kitchens. These formats require a 10–12 mm notched trowel, mandatory back buttering for tiles above 60×60 cm, and a minimum 45-minute open time for positioning and levelling. The complete adhesive specification, trowel size guide, and back buttering technique for every large format tile dimension covers the full installation method for large kitchen floor tiles. Dush Apex Limitless’s 45-minute open time is the EN 12004 E classification that large format kitchen tile installation requires.
Best Tile Adhesive for Kitchen Wall Tiles
Requirements for Vertical Applications
Kitchen wall tiles must be held in position on a vertical surface from the moment they are placed until the adhesive cures — without sliding, without sagging, and without requiring mechanical support (tile spacers wedging them in place temporarily). This requires EN 12004 T (reduced slip) classification — the adhesive must limit tile movement to 0.12 mm maximum on a vertical surface during the open time.Standard adhesive without T classification cannot hold heavier wall tiles — particularly large format porcelain or stone — on vertical kitchen surfaces. Dush Apex Limitless carries EN 12004 T classification with 0.12 mm maximum slip, making it suitable for all kitchen wall tile applications including full-height wall cladding.
Adhesives for Ceramic Wall Tiles
Ceramic kitchen wall tiles — standard formats 30×45 cm, 30×60 cm, 60×30 cm — are the most common wall tile specification in Indian residential kitchens. Polymer-modified adhesive with EN 12004 C2T classification is the correct specification. The T (anti-sag) classification ensures tiles hold on the vertical surface. The C2 moisture resistance classification addresses the ongoing steam and splash exposure that kitchen walls face.
Adhesives for Porcelain Wall Tiles
Large format porcelain wall tiles — increasingly common in modern Indian kitchen designs with 60×120 cm or 60×60 cm tiles on full-height kitchen walls — place the highest demands on the adhesive. Heavy tiles on vertical surfaces require both the T (anti-sag, 0.12 mm maximum slip) and the C2 (improved bond strength) classifications. The 45-minute open time of Dush Apex Limitless allows precise alignment of large porcelain wall tiles, matching grout lines and surface patterns across the full wall height.
Adhesives for Kitchen Backsplashes
Kitchen backsplashes sit behind cooking surfaces — the most thermally active zone in the kitchen. Tiles on the backsplash above a hob or gas range experience direct heat exposure from cooking, combined with moisture from steam and regular cleaning with chemical agents. EN 12004 C2TE S1 is the correct classification for kitchen backsplash applications: the S1 deformability accommodates the thermal cycling from cooking heat, and the C2 moisture classification handles daily cleaning exposure.For marble kitchen backsplashes — a premium specification increasingly common in Indian luxury residential kitchens — white polymer-modified adhesive is mandatory. Grey adhesive stains light marble backsplash tiles permanently. The full guide to selecting the correct white fixing chemical for marble and light stone surfaces applies directly to marble kitchen backsplash specifications. Dush Apex Limitless white formulation is the correct product for marble, travertine, and all light stone kitchen backsplash installations.
Factors to Consider When Choosing Kitchen Tile Adhesive
Tile Material
Ceramic and standard porcelain tiles in common Indian formats (up to 60×60 cm) can be fixed with IS 15477:2019 Type 4 polymer-modified adhesive. Natural stone — marble, granite, travertine, slate — requires white polymer-modified adhesive to prevent pigment staining, particularly for light varieties. Which chemical is used for marble tile fixing — and why the fixing chemical choice is irreversible once the marble is placed — is the critical decision point for kitchens with stone surfaces.
Tile Size and Weight
Tile size directly determines the trowel size, back buttering requirement, and open time needed. Tiles below 40×40 cm can be fixed with a 6 mm notched trowel and standard open time. Tiles from 40×60 cm to 60×60 cm need an 8–10 mm notched trowel and benefit from back buttering. Tiles above 60×60 cm require a 10–12 mm notched trowel, mandatory back buttering, and 45-minute open time. Marble and heavy stone tiles require back buttering at all sizes.
Surface Type
New concrete or screed must cure for a minimum 28 days before tiling. Existing ceramic tile surfaces can be tiled over with polymer-modified adhesive if they are structurally sound, clean, and without hollow sections. Sand-cement render walls require priming in high-absorption conditions. Gypsum board partitions in modular kitchens require specific adhesive compatibility — confirm with the adhesive manufacturer’s TDS before application.
Indoor vs Outdoor Kitchen Areas
Most Indian residential kitchens are indoor environments — but utility kitchens, open terrace cooking areas, and farmhouse kitchens may include outdoor or semi-outdoor zones. Outdoor kitchen tile areas require EN 12004 S1 deformability classification in addition to C2 moisture resistance. Which tile adhesive classifications cover both indoor and outdoor tile applications — and why the S1 classification is mandatory outdoors in Indian climatic conditions — directly applies to kitchens with outdoor cooking or utility areas.
Moisture Resistance Requirements
All Indian kitchens are wet areas by function — the EN 12004 C2 classification (improved moisture resistance from polymer modification) is the minimum standard. For kitchens with continuous water exposure at specific zones — sink area, dishwasher position, wet cooking prep areas — applying a waterproofing membrane to the substrate before tiling in those zones adds a second layer of protection that the adhesive’s moisture resistance alone cannot substitute for.
Setting Time and Workability
Setting time — the period from application to initial adhesive set — varies by product and ambient temperature. In Indian summer conditions above 35°C, open time reduces. Dush Apex Limitless provides 45 minutes of open time under EN 12004 E classification — sufficient for large format kitchen tile installation even in warm conditions, though working in smaller sections is recommended above 35°C.
Tile Adhesive Classification Explained (C1, C2, S1, S2)
IS 15477:2019 and EN 12004 use classification systems that encode performance criteria into short alphanumeric codes on the product packaging. Understanding these codes eliminates the need to rely on brand marketing to evaluate an adhesive.
What C1 and C2 Mean
C identifies the adhesive as cementitious (cement-based). The number following C identifies the performance level: C1 is basic cementitious adhesive — minimum polymer content, minimum bond strength, suitable for standard ceramic tiles in dry indoor conditions. C2 is improved cementitious adhesive — higher polymer content, higher bond strength, moisture resistance — the minimum classification for kitchens, bathrooms, and any application beyond standard dry indoor ceramic. Dush Apex Limitless is C2 — confirmed by independent European laboratory testing under EN 12004.
Flexible Adhesives (S1 and S2)
S refers to deformability — the adhesive bed’s capacity to flex with movement without cracking. S1 means the cured adhesive accommodates up to 2.5 mm of lateral movement. S2 means up to 5 mm — required for highly flexible substrates, movement joint areas, or extreme thermal environments. For Indian residential kitchens, S1 is the correct specification — covering thermal cycling from cooking heat and the general structural movement of the building over time. S2 is typically specified for commercial kitchens, external cladding, and specialty applications. Dush Apex Limitless carries S1 classification — the correct level for residential kitchen tile installation. How architects specify these classifications in formal project documents for kitchens and other tile applications in India details what each classification means in a project specification context.
Which Classification Is Best for Kitchens
For residential kitchen floors and walls in India, the correct classification is EN 12004 C2TE S1: improved adhesive (C2), anti-sag for wall tiles (T), extended 45-minute open time (E), deformable for thermal movement (S1). For IS 15477:2019, Type 4 TS1 is the polymer-modified classification with independently tested tensile bond strength. Dush Apex Limitless carries both — the only kitchen tile adhesive in India with dual Indian and European certification and Italian manufacturing.
How Much Tile Adhesive Do You Need?
Coverage Calculation Formula
Tile adhesive coverage per 20 kg bag varies by trowel notch size. The larger the notch, the more adhesive is consumed per square metre: Trowel sizeTile formatCoverage per 20 kg bag6 mm notchedUp to 40×40 cm5–7 sqm8 mm notched40×60 cm to 60×60 cm4–5 sqm10 mm notched60×60 cm to 90×90 cm3–4 sqm12 mm notchedAbove 90×90 cm and marble slabs2.5–3 sqmAdd 10–15% to all figures for waste, mixing variation, and back buttering on large format tiles.
Factors Affecting Consumption
Coverage figures reduce when back buttering is applied — back buttering adds a complete skim coat of adhesive to the tile back, consuming an additional 0.5–1 kg per sqm beyond the floor application. Substrate irregularities increase consumption — floors deviating more than 3 mm under a 2-metre straight edge require additional adhesive to fill low spots. High ambient temperatures reduce pot life and may increase waste from premature skinning.
Example Calculation for Kitchen Floors and Walls
A standard Indian modular kitchen with a 12 sqm floor area (60×60 cm porcelain tiles) and 15 sqm of wall tiles (30×60 cm ceramic backsplash and full-height walls):Floor: 12 sqm ÷ 4 sqm/bag (10 mm notch) = 3 bags + 15% waste = 4 bagsWalls: 15 sqm ÷ 6 sqm/bag (6 mm notch) = 2.5 bags + 10% waste = 3 bagsTotal: 7 bags of Dush Apex Limitless (20 kg each) for a standard kitchen installation.
Step-by-Step Guide to Applying Tile Adhesive in Kitchens
Surface Preparation
The substrate must be structurally sound, clean, and flat. Check flatness with a 2-metre straight edge — maximum 3 mm deviation for tiles up to 60×60 cm. Grind down high spots. Fill low spots with levelling compound and allow full cure before tiling. Remove all dust, grease, oil, paint, curing compounds, and any previous adhesive residue. Existing tiles being tiled over must be sounded for hollow sections — any hollow tiles must be removed and the substrate made good before proceeding. New concrete must cure 28 days minimum.
Mixing the Adhesive
Pour clean, cool water into a clean bucket first — 4.5 to 5 litres per 20 kg bag of Dush Apex Limitless. Add the powder to the water gradually while mixing — never pour water into powder. Mix with a low-speed electric paddle mixer (400–600 RPM) for 2–3 minutes until completely smooth with no lumps. Allow the mix to slake (rest) for 5 minutes — this allows the polymer to fully hydrate. Remix briefly for 30 seconds before use. Do not add extra water to adjust consistency after mixing.
Selecting the Correct Trowel
Use the notch size matched to the tile format: 6 mm for ceramic wall tiles up to 40×60 cm, 8 mm for porcelain floor tiles up to 60×60 cm, 10 mm for large format floor tiles from 60×60 cm to 90×90 cm, 12 mm for slabs above 90×90 cm and all marble. A flat trowel is additionally needed for back buttering large format tiles and all marble.
Applying Adhesive Properly
Apply Dush Apex Limitless to the substrate using the notched trowel held at a 45–60° angle. Comb parallel ridges in one direction only — never circular or random strokes. Parallel ridges allow air to escape from beneath the tile as it is pressed into position. Apply only the area you can tile within the 45-minute open time. If the adhesive surface develops a dry skin before the tile is placed, scrape it off, apply fresh adhesive, and tile immediately.
Installing the Tiles
For large format floor tiles (above 60×60 cm) and all marble or stone: apply a skim coat of Dush Apex Limitless to the tile back face (back buttering) before pressing into position. Lower the tile onto the adhesive bed and press firmly with both palms across the full surface. Use a rubber mallet to seat the tile — work from the centre outward, not from one edge across. Check level with a spirit level. Do not slide tiles to adjust position — lift, reposition, and press again.
Grouting and Finishing
Allow Dush Apex Limitless to cure for a minimum 24 hours before grouting. Use unsanded grout for joints under 3 mm. For marble or light stone backsplashes, use white grout only — grey grout stains light marble at the joint faces permanently. At all perimeter joints (wall edges, door frames, under kitchen cabinetry), use silicone sealant rather than grout — these are movement joints that cement grout cannot accommodate.
Common Tile Adhesive Mistakes to Avoid
Using the Wrong Adhesive Type
The most costly mistake in kitchen tile installation is using Type 1 basic adhesive or cement-sand mortar for a kitchen that needs Type 4 TS1 polymer-modified adhesive. The cost difference between a bag of basic adhesive and Dush Apex Limitless is minimal. The cost of relaying a kitchen floor because the bond has failed — new tiles, new adhesive, new labour, plus the disruption — is significant. Specify IS 15477:2019 Type 4 TS1 before accepting any adhesive on site.
Poor Surface Preparation
Adhesive cannot compensate for substrate problems. High spots cause tiles to rock and crack under load. Low spots create hollow sections that concentrate stress and eventually cause debonding. Contamination — even cooking oil residue on an existing tile substrate — prevents adhesive bonding. Surface preparation is not the optional first step. It determines whether the installation succeeds or fails regardless of which adhesive is used.
Incorrect Mixing Ratio
Too much water reduces the tensile bond strength of polymer-modified adhesive — the polymer network does not form correctly at diluted concentrations. Too little water prevents proper spread and reduces contact area. Mix to exactly the ratio specified on the TDS — 4.5 to 5 litres of water per 20 kg bag of Dush Apex Limitless. Never add water to a mix that has begun to stiffen — discard it and mix fresh.
Applying Too Much or Too Little Adhesive
Too little adhesive — applied with an undersized trowel — produces incomplete coverage beneath large tiles, creating hollow sections that crack under kitchen floor loading. Too much adhesive — applied too thickly — exceeds the manufacturer’s specified adhesive bed depth and can trap moisture in the adhesive layer. Use the correct notch size for the tile format. Back butter large tiles in addition to the substrate application.
Ignoring Open Time
Placing tiles onto adhesive that has begun to skin over — beyond the 45-minute open time of Dush Apex Limitless — produces a bond that appears secure but fails within months. The skinned adhesive surface has lost its open bonding capacity. The tile sits on a surface that cannot chemically bond. Test before placing: press your thumb firmly onto the adhesive ridge — if it does not deform and transfer adhesive cleanly to your thumb, the open time has been exceeded.
Tile Adhesive vs Cement Sand Mortar for Kitchens
Performance Comparison
Dush Apex Limitless delivers 1.61 N/mm² independently tested tensile bond strength under IS 15477:2019 Type 4 TS1. Cement-sand mortar has no classified tensile bond strength — it varies entirely by site mix, water content, and curing conditions. In kitchen environments with daily moisture and thermal cycling, the polymer-modified adhesive’s performance advantage over cement mortar compounds over time. The complete performance comparison with tested figures for tensile strength, open time, and suitability for marble and large format tiles covers every parameter in detail.
Cost Comparison
Cement-sand mortar appears cheaper by raw material cost. A 50 kg bag of Portland cement plus sand costs significantly less than a 20 kg bag of polymer-modified adhesive. However, mortar is applied in much greater thickness (25–50 mm bed depth versus 3–6 mm for adhesive), consuming far more material per square metre. Labour time is also higher for mortar — mixing on site, levelling the mortar bed, and floating tiles takes longer than adhesive application with a notched trowel. When material consumption, labour hours, and the cost of potential bond failure are included in the comparison, polymer-modified tile adhesive is consistently cost-competitive with cement mortar for kitchen applications.
Durability Comparison
Polymer-modified tile adhesive maintains bond integrity in kitchen moisture and thermal environments. The polymer network resists water absorption and accommodates thermal movement. Cement-sand mortar, without polymer modification, absorbs moisture, loses bond strength progressively in wet kitchen environments, and cannot flex with thermal cycling. In a typical Indian kitchen with 20–25 years of expected tile life, polymer-modified adhesive delivers the full lifespan. Cement mortar in the same kitchen environment typically begins to show hollow sections and debonding within 8–12 years.
Which Option Is Better Today?
For kitchen tile installation in India in 2026, polymer-modified tile adhesive classified IS 15477:2019 Type 4 TS1 is the professional standard. Cement-sand mortar is not classified under IS 15477:2019, has no anti-sag capability for wall tiles, has no extended open time for large format floor tiles, and provides no stain protection for marble kitchen surfaces. Dush Apex Limitless — IS 15477:2019 Type 4 TS1, EN 12004 C2TE S1, 1.61 N/mm², white formulation, Made in Italy — is the specification that replaces cement mortar in every kitchen tile application.
Signs of Tile Adhesive Failure
Hollow Sounding Tiles
Tapping a tile with a knuckle or a coin produces a dull, hollow sound when there is no adhesive contact beneath that section of tile. A properly bonded tile produces a solid, dense sound. Hollow sections beneath kitchen floor tiles indicate partial bond failure — adhesive contact was incomplete at installation, or the bond has broken down over time. Hollow tiles concentrate load at the contact edges and will crack under kitchen floor use. Hollow kitchen tiles should be lifted and re-fixed with polymer-modified adhesive.
Tile Debonding
Tiles that lift at corners, edges, or completely separate from the substrate have suffered adhesive bond failure. In kitchens, debonding typically results from using inadequate adhesive (Type 1 or cement mortar) in a moisture and thermal cycling environment, incomplete back buttering on large format tiles, or applying tiles onto skinned adhesive. Debonded kitchen tiles are a safety hazard — they must be removed and re-fixed immediately.
Cracked Grout Lines
Cracked grout lines are an early indicator of adhesive bed stress — the adhesive cannot accommodate the movement occurring in the tile-substrate assembly, so the stress is expressed through the grout. Grout cracking at perimeter joints (where walls meet floors) is typically a movement joint failure — those joints should have been filled with silicone, not cement grout. Cracked grout throughout the field of a kitchen floor suggests the adhesive bed lacks S1 deformability.
Water Damage Behind Tiles
Staining on kitchen walls around tile edges, efflorescence (white mineral deposits) appearing through grout lines, or tiles that shift position when pressed suggest water has penetrated behind the tile surface. Once water reaches the adhesive bed through compromised grout lines, non-polymer adhesive softens and bond failure accelerates. Polymer-modified adhesive with EN 12004 C2 classification resists this — but compromised grout lines should be re-grouted promptly regardless of the adhesive specification.
Maintenance Tips for Long-Lasting Kitchen Tile Installations
Cleaning Recommendations
Clean kitchen floor tiles with pH-neutral floor cleaner — avoid highly acidic cleaners (vinegar, lemon-based) on natural stone tiles and avoid alkaline bleach-based cleaners on marble regularly. For ceramic and porcelain kitchen tiles, periodic deep cleaning with a commercial tile degreaser removes the cooking oil film that accumulates over time. Grout lines should be cleaned with a soft brush rather than metal scrapers that can damage the grout surface.
Preventing Water Infiltration
Inspect kitchen backsplash silicone joints — at the worktop-to-tile junction and at the cabinet-to-tile junction — annually. Silicone degrades over time, particularly with cleaning chemical exposure. Re-apply silicone sealant at any joint showing cracking or separation before water can penetrate behind the kitchen tiles. For marble kitchen surfaces, reseal the stone with penetrating sealer every 12–18 months.
Periodic Inspection Tips
Tap kitchen floor tiles with a coin or knuckle every two to three years — particularly in high-traffic zones near the sink and cooking area. Hollow sections should be addressed before they expand. Check grout integrity annually — hairline cracks in grout lines are easily re-grouted before water penetration occurs. Any tile that shifts or rocks when stepped on has lost its bond and must be re-fixed before it presents a safety hazard.
Frequently Asked Questions — Tile Adhesive for Kitchen
Can Tile Adhesive Be Used on Existing Kitchen Tiles?
Yes — polymer-modified tile adhesive can be applied directly over existing ceramic or porcelain kitchen tiles if they are structurally sound, clean, and fully bonded (no hollow sections). Sound all existing tiles before proceeding. Remove any hollow or cracked tiles and fill the substrate before applying adhesive and new tiles. The additional tile layer must not exceed the height clearance of kitchen cabinetry and appliances. Dush Apex Limitless is suitable for tile-on-tile applications.
Which Adhesive Is Best for Porcelain Kitchen Tiles?
Polymer-modified IS 15477:2019 Type 4 TS1 adhesive is required for all porcelain tiles — porcelain’s low-absorption back surface demands the chemical bond that polymer modification provides. Dush Apex Limitless — 1.61 N/mm² tensile, EN 12004 C2TE S1, 45-minute open time — is suitable for all porcelain kitchen floor and wall tile formats.
How Long Does Kitchen Tile Adhesive Take to Cure?
Dush Apex Limitless reaches initial set in 2–4 hours under standard Indian conditions. Light foot traffic is safe after 24 hours. Heavy use, furniture placement, and grouting should wait 24 hours minimum. Full structural strength develops at 28 days. Do not wet the surface within 12 hours of installation.
Is Waterproof Tile Adhesive Necessary for Kitchens?
All polymer-modified adhesive classified EN 12004 C2 is water-resistant — not waterproof in the absolute sense, but resistant to moisture absorption throughout the adhesive layer. For kitchens with continuous water exposure (near the sink, dishwasher area), apply a waterproofing membrane to the substrate before adhesive and tiling in those specific zones. Dush Apex Limitless EN 12004 C2TE S1 provides the adhesive moisture resistance — the membrane adds substrate-level protection in high-exposure zones.
Can the Same Adhesive Be Used for Floors and Walls?
Yes — if the adhesive carries EN 12004 C2TE S1. The T classification confirms anti-sag performance for vertical applications. Dush Apex Limitless is the same product for kitchen floors, kitchen walls, and backsplashes — no product switching needed across the kitchen installation.